Archive for the ‘
Helpful Organizing Tips ’ Category

Do you ever watch TED Talks? I love watching them
If I get to watch at least one a day I’m a happy camper. I watch them while I’m cooking, while I’m on the treadmill, and while I’m eating lunch at my computer. If I don’t have the time, I use one of my favorite apps, Pocket to store them until I have a free 20 minutes to watch.
TED began as a conference in California in 1984–five years before the birth of the World Wide Web. TED stands for Technology, Entertainment and Design. It’s mission is to spread knowledge and since it’s inception, TED Talks have had attracted over a billion views online–there’s a lot more knowledgeable people in this world thanks to TED!
With all my TED Talk watching, I was curious as to whether there were any talks on the topic of Organizing. Well–there are! No one is sorting through papers or an overstuffed garage on stage, but the talks I’ve selected are based on an ‘organizing’ theme. Carve out time in your day to watch them–you may learn something new just like I did…
Jessi Arrington: Wearing Nothing New
In my opinion, Jessi is one brave woman. She packed seven pair of underwear for her trip to Los Angeles to do her TED Talk. My heart is palpitating just thinking about it. When she got off the plane with her very tiny suitcase, she went shopping for clothes at local thrift stores in order to “reduce the impact of her wardrobe on the environment and her wallet.” I don’t expect you to watch this and then travel light, but listening to what she has to say, might cause you to take a good look at the clothes in your closet.
Laura Vanderkam: How To Gain Control of Your Free Time
Laura Vanderkam writes about Time Management. She says, “Time is highly elastic. We cannot make more time but time will stretch to accommodate what we choose to put into it.” Basically–it’s all about priorities. Your priorities. Your schedule and your choices. Watch and listen to her and think about how you use your time…
Tim Urban: Inside the Mind of a Master Procrastinator
Do you procrastinate often? Whether you do or not, you’re going to get a good laugh out of this funny TED Talk. You might even see a bit of yourself in Tim Urban. Think about what you might be procrastinating on and watch out for the ‘monkey.’
*BONUS* Yes–I said ‘3’ in the title but this one is short–only around 5 minutes long: Mundano: Pimp My…Trash Cart?.
The unsung heroes of the organizing world are garbage men. They take away what we no longer want in our lives and are not always highly regarded for their work. Watch how one artist in Brazil took the work of Catadores, people who collect recycling, and transformed their work into an art form to be celebrated and appreciated by their communities.
Which Ted Talk resonated with you? Share your thoughts in the comments below.

SaveSave
There are no cave paintings to prove it but I suspect the first shelf was commissioned by a frustrated cave woman.
The conversation probably went something like this:
Cave Husband: “Honey, I’m home! I brought berries and bagged another buffalo!”
Cave Wife: “That’s nice, dear but this cave has no storage. Stop hunting and gathering and start building me some shelves!”
Though shelving is standard in homes today, it can sometimes feel pre-historic. That’s because pre-fabricated and pre-installed shelves don’t always fit our specific storage needs. Some of the problems with shelves are that they are:
– too shallow
– too deep
– too high
– too low
– can’t be adjusted
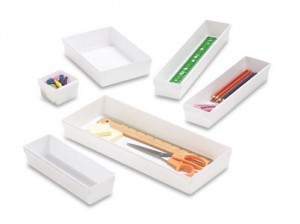
If you have some of these shelving issues in your closet, pantry, cabinets, or garage, here are five products to transform your shelves into a custom-designed (and organized!) wonderland:
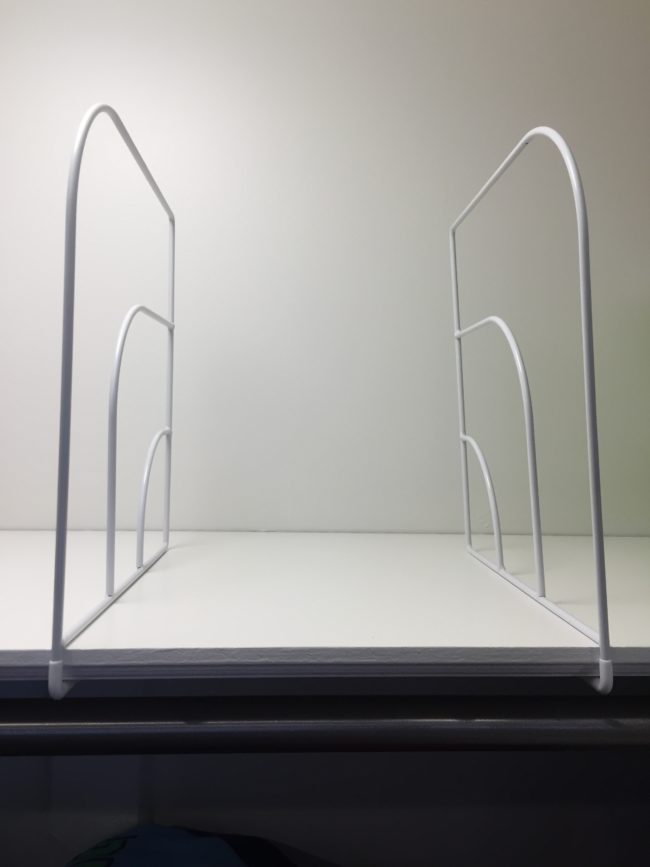
Shelf Dividers
Shelf dividers prevent stacked items from toppling over. Use dividers to separate piles of sweaters, tablecloths, or towels. You can also use them to create ‘parking spaces’ for your handbags. Dividers come in acrylic, plastic, or chrome (depending upon your style and budget).
I reviewed this product for STORABLES last month and I use them in my home. Take a peek…
Under Shelf Basket
Clustering small items on shelves leaves you with dead space above it. The Under Shelf Basket solves that problem by creating an area in that ‘dead space’ for storage. It creates the perfect spot for storing dishtowels and washcloths in a linen closet, small canned goods/spice packets in a pantry, and food wrappings (like aluminum foil and waxed paper) on a cabinet shelf.
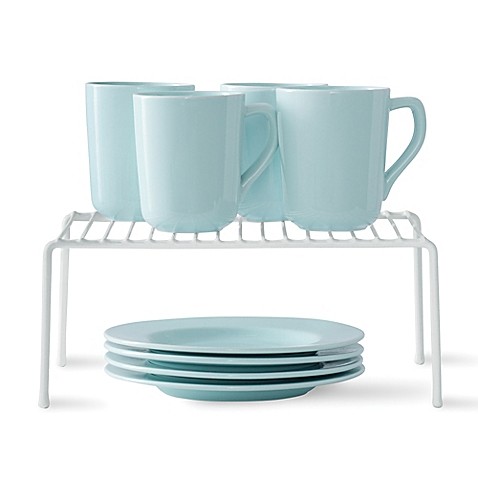
 Helper Shelf
I love Helper shelves! I have over ten of them currently in use in my own home. They turn wasted shelving space into prime real estate for dishes, canned goods, or any stackable item. A helper shelf offers two levels of storage–below (for small items) and above (for larger items).
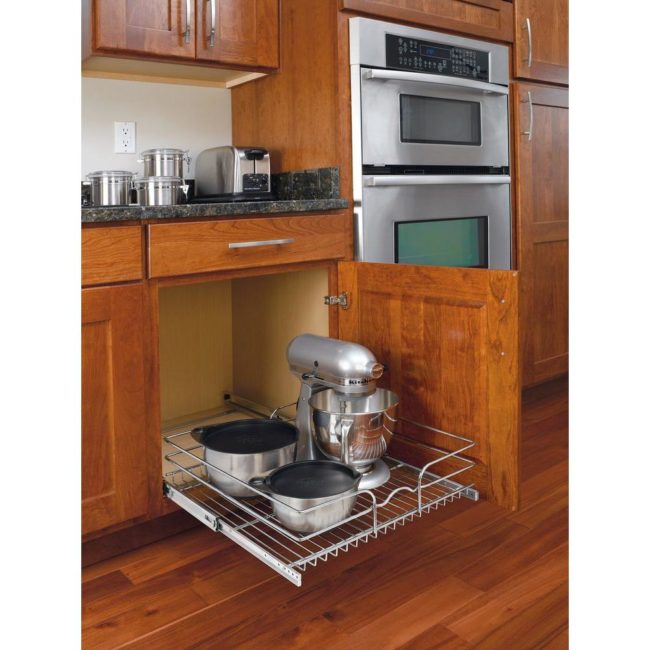
 Pull Out Shelf
If you’re tired of rummaging for items at the back of your shelves, consider a sliding shelf (also known as a rolling or pull-out shelf). It pulls out so you can reach what you need that lives in the back of your shelving/cabinet and then pushes right back in. Great for items that are heavy and not often used.
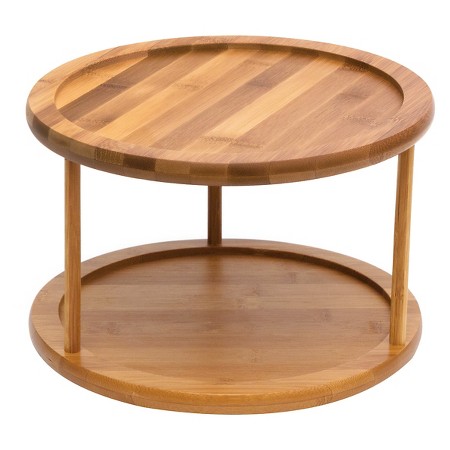
Lazy Susan
This product is perfect for those hard-to-reach corners in a cabinet or shelf. You can purchase a lazy susan with one or two levels depending upon your needs. In my home, I use them for vitamins and spices–both located in tight cabinet spaces. Spinning the lazy susan to reach and retrieve what I need makes my life a whole lot easier!
Use any of the above products to optimize your home’s shelf space. When your spouse calls to tell you he’s bringing home berries and buffalo–you’ll be prepared…
Which product would you like to try on your shelves?
SaveSave
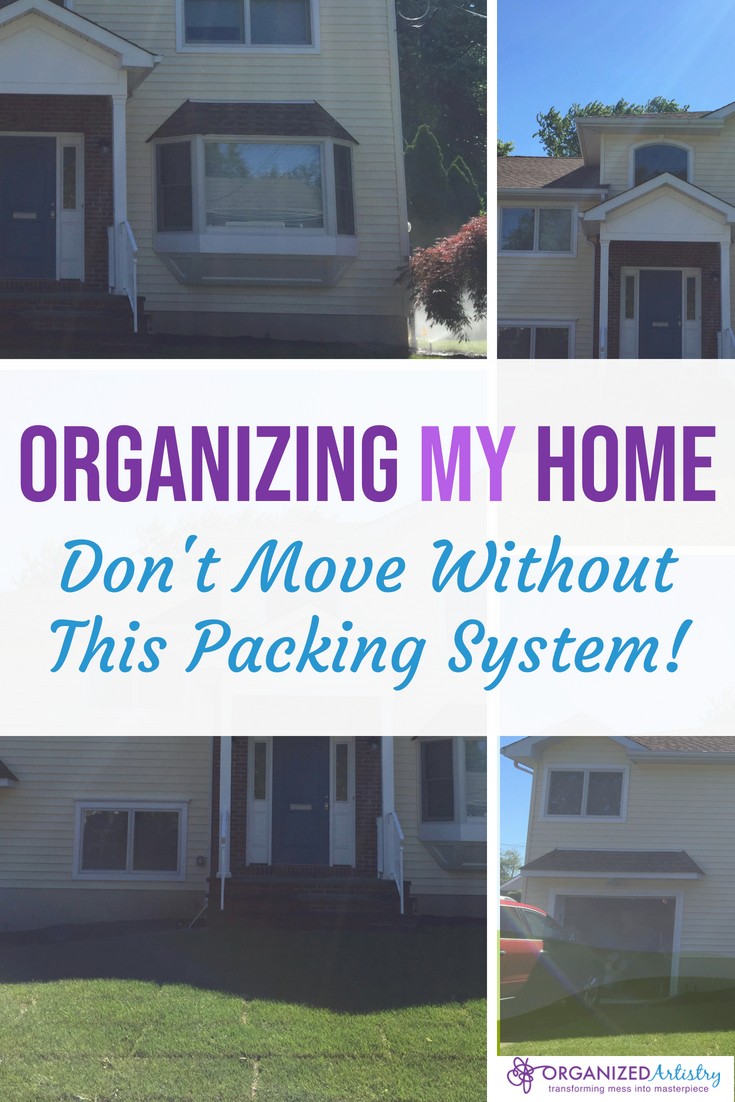
If you’ve been following my recent Organizing MY Home series, you know that I moved twice in one year due to an addition/renovation project. Part of what made such an upheaval bearable and organized were a few key moving tips I created for myself and a packing system that helped us find anything we needed while we were living in our rental space.

This wasn’t your typical move from one home to another. We were packing up our entire house, moving it to a rental property but not opening all our boxes and setting up to stay. Our plan was to only open boxes of items we truly needed and keep most of the rest sealed until we returned to our renovated home.
As a Professional Organizer, I have offered clients packing ideas but never for a double move. I also hadn’t packed up and moved myself for many years so I took to the internet and did some research on line on how best to pack an entire home. I came across a few posts, mostly from military wives who had lots of practice packing and relocating their households and gleaned some ideas from their experience. I quickly learned that writing the contents on the outside of the box is a magnet for unscrupulous movers. And what if we stacked the boxes so we couldn’t see what was written on the outside? I needed some other ideas. I then came across a post online that would help me. It gave me some good ideas that I adapted to our particular situation.
Based on ideas I read online, I chose to create a numbering system that would enable my husband and I to track and quickly locate of all our belongings during both moves. My husband created the cover sheet and tracking sheets of the packing list and left a few lines blank for anything we needed to add.
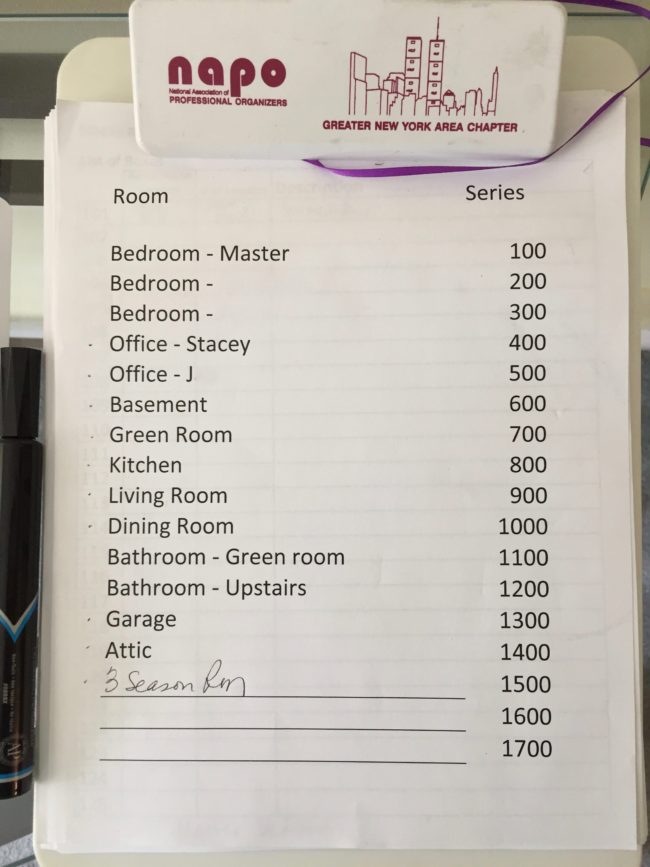
My ‘vintage’ NAPO-NY clipboard and trusty black marker.
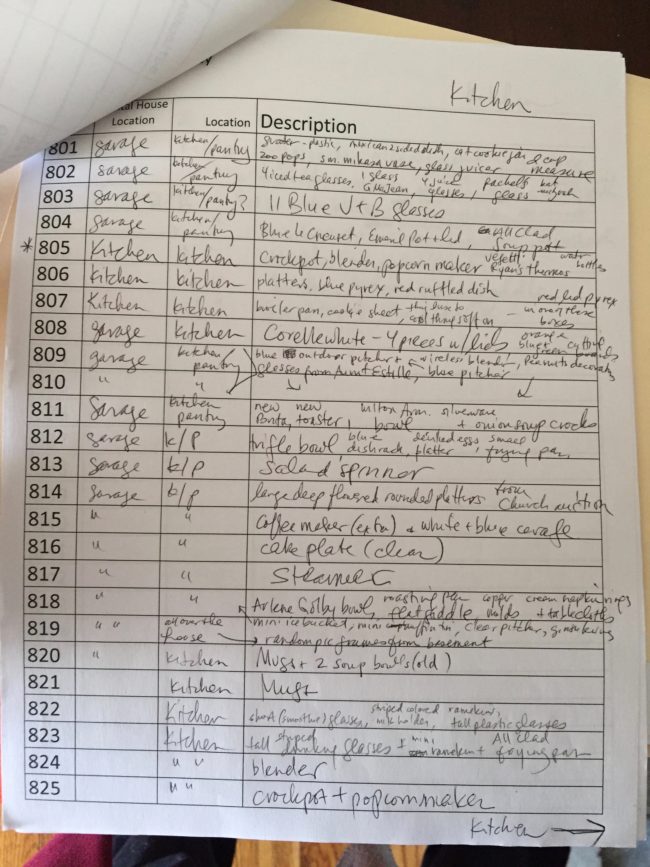
Each room in our home received a number series. As we packed items from each room, we wrote down the contents of the box on the line next to the box number. We also jotted down where the contents/box would be in our rental and where it would go once it came back to our renovated home. An example is below:
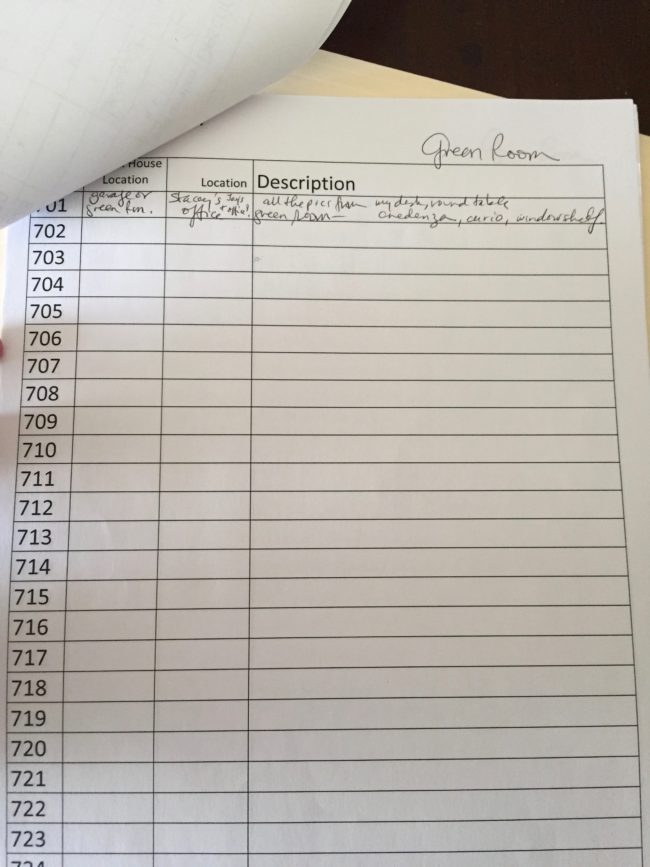
A sample page from our packing list.
Here’s the breakdown of the columns on the page:
• Top of the page: Room Name (also written at the bottom of page–not shown in photo)
• Column 1: Box number
• Column 2: Where box is going in rental home (a room vs. the garage for storage)
• Column 3: What room the box will go to when it comes back to our renovated home (our address was originally next to the word ‘Location’)
• Column 4: Contents of the box
In the above photo, the ‘Green Room’ (the walls had been green for many years) at this point only had one box. This was because my home office was relocated there after our second child was born and the contents of the room would eventually be spread to three different spaces after we moved back in. Lucky for us, our rental space was a split level very similar to ours so you see in column 2 that we figured the box would either live in the garage or be unpacked into the rental home’s equivalent of our ‘Green Room.’ In box 701 (column 1), was framed family pictures (column 4) (they ended up in the garage) that eventually would live in my home office and my husband’s home office (column 3).
Depending upon the room and it’s contents, some of the pages looked fairly empty. Then there are rooms such as the kitchen that practically filled two pages! (Yes–we did purge before packing.) Notice–the top part of the page dealt with the move to the rental property while the bottom part (and the next page, too) dealt with the move back to our home. We unpacked much of our kitchen stuff and then had to repack it for the move home. Example:
Lots more to pack in the kitchen!
You might be thinking, “This sounds like A LOT of work!’ Yes, it was a lot of work! But, when it comes to time management, I advise my clients that spending more time at the beginning of a project will save you time at the end of it. Take the time to write the contents of each box on your list. You’ll be happy you did when you’re looking for an item you need!
This system isn’t just for double moves. You can delete a column or add an extra one for your unique moving situation. My husband and I found this system to be incredibly helpful in keeping us organized and knowing where to find all that we owned.
A few tips for using this packing system:
• If you are keeping some numbered boxes in storage for a while, group the boxes by ‘like’ numbers (all 200’s together, all 500’s together, etc). It will make finding the box you need much less time consuming!
• Write the box numbers on the top and at least two sides of the box–the more sides the better–a good task for kids old enough to write!
• Use a thick dark colored marker for writing the numbers on the boxes. Buy a box of them–they will run out of ink quickly from numbering all of those sides!
• When you are finished packing, back it up! Make a photocopy of the Master List and put it somewhere safe and take pictures of each page with your phone.
• Designate one spot to keep your Master List in so you’ll always know where to return it to and where to find it the next time you want to pack/unpack more boxes.
We’ve been living in our renovated home almost six months and some of our boxes are not yet unpacked. I still refer to the Master List when I’m looking for something and it sits in the same spot I designated for it the day we moved back in. As helpful as this system was, my husband and I agree–we’re not moving again for a LONG time!
Could this system be helpful to you in a move? Let me know in the comments below.
SaveSave
SaveSave
I haven’t moved much in my lifetime. I went away to college and moved some of my stuff with me. As a single gal, I moved in and out of a one bedroom apartment, then moved those belongings to a house when I got married. After that, no moving for fourteen years.
So, when my husband and I decided to renovate and add on to our home, we chose to move our family and 98% of what we owned to a rental across town for the duration of the project. Once our house was finished we would pack up again and move back in. Two moves in one year. Gulp. I was a little out of practice. But, I knew that if we were organized, we’d get the job done with barely a few mishaps.
Here are some tips that helped us have an organized move (twice!):
Start purging early
If you have been in one place for a while, you have probably accumulated some ‘stuff.’ For some of you, you might have A LOT of ‘stuff.’ Advice that I learned early on and continue to pass on to my clients is, “Don’t pay to move anything you don’t want moved in the first place.” With that quote in mind, I created the ‘two-can’ rule. Every weekend, we purged an area of our home and made sure to fill our two garbage cans before trash collection day. Making decisions can take a while–my recommendation is to start purging as soon as you know you’ll be moving.
Delegate
It takes a village to pack up a home and move so line up your villagers and let them know how they can help! Some examples of how they can help you are:
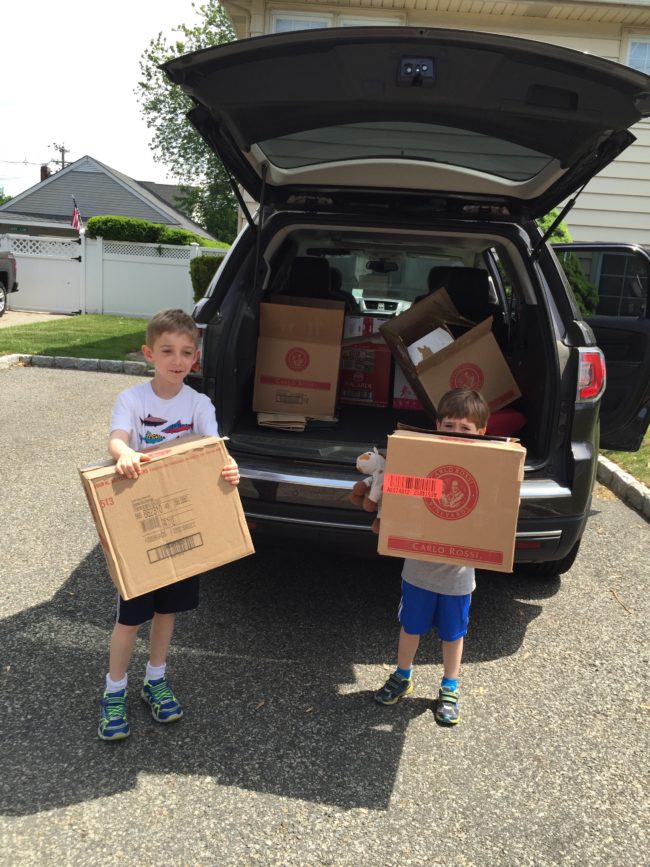
-Get your kids involved. Have them crumple up newspaper. Have them bring empty boxes to different rooms. Ask them to purge and pack their own belongings. It is a good exercise in decision-making and takes some tasks off your already-full plate.
-Ask friends and relatives to bring you their old newspapers, help you pack boxes, hold onto valuables, babysit your kids–whatever you need to ensure a smooth packing and moving experience.
-Get it delivered. The internet can be part of your village, too. Run out of packing tape? Order it. Need more boxes quick? Look on Craigslist or Facebook to see if any of your neighbors are getting rid of boxes and stuffing. Need to research moving companies? Google! And have dinner delivered, too…
–NAPO. Yes–there are Professional Organizers who specialize in packing and moving people. Head to the NAPO website to find someone in your area and let a professional be part of your village.
Organize your packing supplies
If you can, start the packing process as far in advance as you can. You’d be surprised how long it takes to pack an entire home! While you’re purging, this would be a great time to start collecting packing supplies such as:
-boxes from the liquor store or from a boxed product other than food
-a minimum of one tape gun per person doing the packing
-packing tape
-newspaper and store circulars
-thick black markers/Sharpies
-bubble wrap/packaging from packages you’ve received
-scissors/box cutter
-plastic wrap/plastic baggies of varying sizes
-paper/pen/labels
Keep all of your packing supplies in one spot. Use a bucket/caddy large enough to hold your tape gun, scissors, 2-3 black markers, labels, etc. A bucket/caddy is easy to transport from room to room and easy to spot amidst a room full of boxes. Place supplies back in the bucket when you’ve finished a box-packing session so you’ll know where they are the next time you want to fill a box.
Create an organized packing system
We had to keep track of over 100 boxes. Some of those boxes we unpacked in our rental home and some stayed packed for nine months in our garage. In order to find what we needed during those nine months, I had to create a packing system that would allow us to easily locate clothes and other belongings for Summer, Fall and Winter. Keep an eye out for my next post–you’ll see the Master Packing List my husband and I created to keep us organized through two moves.
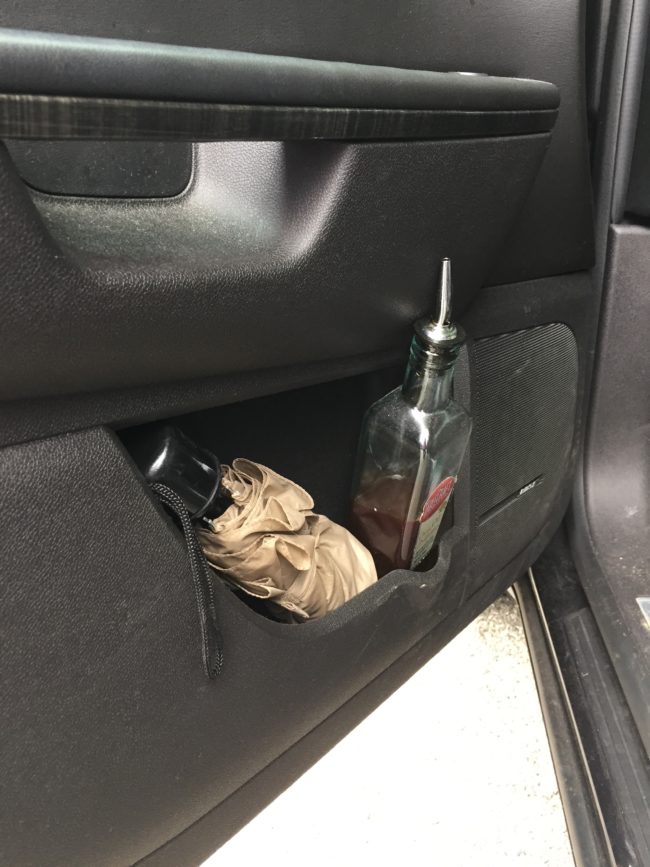
By the way, some things just don’t fit easily in a box. Here’s how I moved our close-to-full olive oil dispenser–who knew my driver’s side cup holder could be the perfect spot to nestle it for the short ride across town?
Thanks to some organization, our amazing ‘villagers,’ and a highly competent moving company, we survived our two moves!
Montvale Movers moved us twice!
Next post: The packing system that got me through two moves in a year…
SaveSave
SaveSave
Whether I’m at a networking meeting, a client’s home, or a social or family gathering I am often asked the same few questions about getting organized. Some people ask me about products, others ask me how I feel about all the organizing shows that have been on television, but most ask the questions below.
I hope the answers to these questions prove to be helpful as you begin or continue your journey to an organized life.
Why is it important to be organized?
Organized people are able to find the things they need when they need them—and finding what you need when you need it is what ‘being organized’ is all about. Being organized saves you time, money, and stress. By being organized, one is able to put lost time back in their day, money back in their wallets, and live life with less stress and frustration overall.
How do I get organized if I don’t have the time?
You have to MAKE the time. If you didn’t make the time to get your car an oil change would it work well? If you didn’t make the time to exercise and cook healthy meals would your body be able to maintain an active lifestyle? If you don’t set aside the time to ‘get organized,’ your household as well as your life will not function to it’s fullest capacity.
Start by making a fifteen-minute appointment with yourself at a time of day when you are most energetic. Mark it in a calendar and stick to it. You don’t need to devote eight hours on a Sunday to getting organized—you’d be amazed at how much you can get done by spending fifteen minutes in ‘organizing mode.’
Where do I begin?
I’m always asked this question and the person asking it usually has a look of panic on their face! I always recommend to people that they take inventory of their organizing needs and select an area that is driving them crazy or making their life difficult. For a small business owner, it may be their filing system. For a stay-at-home mom, it may be the playroom or the kitchen.
Break the task down into small, manageable tasks. For instance, if it’s your kitchen that’s disorganized, start by going through the silverware drawer. After you’ve tackled the drawer, you’re done with organizing for the day unless you choose to move on to another small section of the kitchen such as the sippy cup collection or the spice rack.
Once I’m organized, how do I maintain it?
The most important thing you need to keep your home/home office organized is DESIRE—the desire to keep your space organized and the desire to put forth the effort to keep it as so. Realistic goals are also necessary when it comes to ‘staying organized.’ You cannot expect an overnight change–on average it takes 21 days to establish a habit. So, if you install a hook by the front door for your keys and you forget once in a while to hang them there, don’t beat yourself up over it—it will come naturally soon enough.
Be prepared–there will be some days where you won’t have the time or energy to organize even the smallest of spaces—that’s OK. Just do your best. I tell people that one of the most important things they can do when they lack the time or energy to organize is to just stay ‘on top of their lives.’ Putting dishes back in the cabinet after they’ve dried, dealing with your mail shortly after you walk through the door, straightening out the medicine cabinet while you’re brushing your teeth are all quick and easy ways to prevent disorganization from creeping back into a newly organized space.
What can a Professional Organizer do for me?
A Professional Organizer has the skills and experience to provide their clients with information, ideas, solutions and systems to increase productivity and reduce stress. By hiring a professional organizer you will not only be able to take advantage of their knowledge, and expertise, but you’ll be able to benefit from their non-judgemental physical and emotional support as well.
To find a Professional Organizer in your area, go to the website of the National Association of Professional Organizers and click on ‘Find an Organizer.’ It may be the first step on your journey to an organized life.
Do you have any other questions? Ask away!
SaveSave
It’s been a bad winter. Really bad. Snow, ice, freezing temperatures for weeks on end have made life more challenging this season. Just like any other season, it’s important to be prepared with the tools to get through the changes in weather–shovels, rock salt, snow brushes, warm gloves and boots–the list goes on. My guest blogger, Moreen Torpy of De-Clutter Coach in Ontario, Canada knows a thing or two about being prepared for cold weather. Today she’s sharing with us ‘Southerners’ 25 ways to survive an ice storm. I hope we never have to use any of these tips, but they’re here for you just in case…
This winter has brought more than our fair share of ice storms and the resulting power outages, cold, inability to access transportation and all manner of other inconveniences.
After the realization sinks in that this might be a longer experience than you’d like it to be, after realizing you’re very cold will be the thought of what to do with food so it doesn’t become waste.
The following are lessons I learned from surviving the 1998 ice storm in Montreal:
Food:
1. Keep a few large plastic storage containers or clean garbage bins available to store your freezer contents outside without power. You can always chip off the ice to get into them when necessary.
2. Fill your BBQ propane tank at the end of summer so it can be used in case of winter emergency to cook whatever you have in your freezer, warm soup or boil water for coffee/hot chocolate/tea. Never use your BBQ or propane stove indoors. Set up in your garage if you have one, or outside
3. Use fresh food first, frozen food second and canned food last so you eliminate as much waste as possible. Cook whatever can be cooked when you can, then eat it cold if necessary. This will ensure less waste and provide as healthy a diet as possible under the circumstances.
4. Ensure you have a manual can opener and know where it is should you need it.
5. Don’t ever get rid of your fondue pot! It can be very useful to warm soup or water. Check now if you have fuel for it, and if not purchase a couple of bottles. Keep them with the pot so you know where they are.
6. Don’t cook anything that takes a lot of cleaning up, such as cheese. Remember, you don’t have hot water to do that right now.
Light/Heat:
7. Collect all candles and batteries from wherever you have them around your house and centralize them in one place. Inventory what you have and purchase what you still need—do you have D-batteries for your flashlight? C-batteries for your portable radio? What about candles? The dollar-store brand won’t last very long not to mention the mess they create when molten wax spills over. Keep something to light the candles with them, whether matches or a BBQ lighter.
8. Find any oil lamps you may have, purchase oil for them and keep them where they’re easily found when needed.
9. Find a mirror and put it with your candles. It doubles the light from lit candles as well as the heat produced. You might also toast marshmallows over the flames if you’re feeling adventurous. Maybe even assemble some s’mores!
Grooming:
10. Get used to the idea it may be a while until you can shower, shave or wash your hair. If there’s a shopping centre nearby with power, you could go to the hairdresser or take your hair dryer and wash your hair there. And perhaps even wash yourself as well. Hot water is better than cold any day for these personal care tasks.
Home:
11. Turn off as many lights and anything else electrical as you remember having on before the power failure and turn on your front porch light. This way, when the power comes back on, you won’t be as much of a drain on the infrastructure, and you’ll know immediately from outside if you have light.
12. Close doors to rooms you’re not using to keep any available heat in those you are using. This is a good time to congregate in as few rooms as necessary to take advantage of each other’s body heat.
13. Close off the entrance to the room where your gas fireplace is, if you have one, and spend your time there. This will keep the heat in that room and not where it won’t be doing any good.
14. Before abandoning your home, pour windshield washer fluid into the drains and toilet to prevent the pipes from freezing when your home has no heat. Also open faucets to allow a small trickle of water to help keep it moving.
Vehicle:
15. Always keep your vehicle’s fuel topped up. If there’s no power, the gas pumps won’t work. Additionally there’ll be less space for moisture to form in the car’s gas tank.
16. Be very careful when removing ice from your vehicle. You don’t want to damage it by being too aggressive
17. Keep your vehicle’s trunk as empty as possible in case you need it to store used cookware that can’t be washed until you have plenty of hot water. You might also store frozen food in your car until you need it.
Varia:
18. Keep an amount of cash in your home—bank machines won’t work without power.
19. If your local shopping centre has WIFI, take your device charger(s) with you and use them there. You might also hang out there with your phone, e-reader or laptop. The food court, while mostly junk food, can provide a hot meal if this is your only choice for one.
20. Don’t bundle up in all your clothes to sleep. I know this sounds counter-intuitive, however you will warm up faster under the covers with just your usual nightwear or just something a bit warmer on. If you share a bed, take advantage of each other’s warmth. This is a good time for all the kids to pile in with parents so everyone stays warmer.
21. Remember Fluffy and Fido will be cold too, so allow them to cuddle with you.
22. Be as active as you can to build body heat if you’re staying in a cold house, but don’t work up a sweat or you’ll be colder than you were before.
23. Keep your medical prescriptions up-to-date, not waiting until you’re on your last pill. If you’re stuck without power, your pharmacy probably is as well and won’t be able to refill them.
24. If you intend to join others (family or friends) to wait out the power outage, select people you get along with and can hopefully find the humour in your situation.
25. Try to look on the experience as an adventure you can talk about and embellish in future telling of the story.
What’s your ice storm experience? Do you have any tips in addition to those above? I’d love to hear about both your experience and your tips. Please share!
© Moreen Torpy
We would be honored for you to reprint this article. If you do, please include the resource box below with the hyperlinks intact.
~~~~~~~~~~~~~~~~~~~~~~~~~~~~~~~~~~~~~~~~~~~~~~~~~
Moreen Torpy is the De-Clutter Coach, a Trained Professional Organizer, Author, and Speaker. Her new book is Going Forward: Downsizing, Moving and Settling In. See www.GoForwardDownsize.com for more about the book including where to purchase it, and www.decluttercoach.ca to learn about her organizing services and other books.
When I complete an organizing project with my clients, I remind them to give themselves a pat on the back for crossing the ‘finish line.’ My guest blogger, Rashelle Isip of the The Order Expert, believes in celebrating the completion of a successful organizing project. Read below to find out the five things she wants you to do after reaching your organizing goal.
“I finally organized my bedroom closet!”
“I filed away that giant stack of papers on my desk!“
“The cabinet under the kitchen sink is finally tidied up!”
Congratulations! You’ve finally completed an organizing project. You’re a bona fide success!
Before you happily rest on your laurels, consider these five pointers to help keep your project a success and let you bask in the glow of a job well done for many months to come.
Plan daily maintenance.
Now that you’ve finally gotten things in order, don’t be lazy and let all your hard work go down the drain! Figure out specific steps to take on a daily basis to help keep your organizing project in order. For example, let’s say you finally organized your bedroom closet. You might decide to place shoes and belts back on their shelves/racks at the end of the day, place dirty clothes immediately in the hamper and fold and store/hang clothes right after the laundry is done to keep things in order.
Take a photo.
You’ve worked hard to achieve your goal. Why not make a record of your achievement? Snap a photo on your cell phone or digital camera for posterity and save the image in an easy to access place. Refer to your photo on any organizing “rainy day,” that is, whenever you feel you’re sliding back into your old habits or are undoing your hard work for a bit of positive reinforcement and motivation to keep things organized.
Plan a smaller organizing project.
You’ll probably be feeling very good after completing your project so consider using this feeling of accomplishment into another organizing project. Keep in mind that your next project doesn’t have to be the same size as the one you just completed and certainly doesn’t have to be completed that same day or week. If you’ve just finished organizing the garage, planning to organize the basement right away probably isn’t such a wise choice. Instead of going whole hog, keep your plans to a smaller project such as cleaning out your wallet.
Share your story with others.
One of the best things in achieving a goal is sharing your accomplishment with others. Thanks to social media, it’s easier than ever share information and stories. Share your success with friends and family via your favorite social media network or tool with photos and a short story. Who knows, you might just inspire someone else to get started on or complete their very own organizing goal!
Celebrate!
Lastly, we can’t forget the importance of celebrating your achievements. Go out for a nice dinner, listen to your favorite music, buy yourself a small gift, relax with loved ones, smile, and of course, enjoy your newly organized space or materials!
Now to you…what do you think of the above? Have you ever given yourself a reward for an organizing job well done? Perhaps you have a reward in mind for the near future for an almost completed project?
Copyright © Rashelle Isip and The Order Expert, 2011-2013.
Rashelle Isip is a blogger, time management, and productivity consultant and professional organizer. She is founder of The Order Expert, a site featuring practical and creative organizing, time management, productivity tips, inspiration and much more. For more information, visit http://www.TheOrderExpert.com. You can follow her on Twitter @theorderexpert, on Facebook at facebook.com/theorderexpert, and on Pinterest at pinterest.com/theorderexpert.

Did you make New Year’s resolutions or set goals for yourself this year? I thought I heard you shouting from the rooftop, “This is the year I’m going to get organized!’
Did you create a plan for getting organized? Have you mapped out some mini-goals for yourself? If yes, then great!
If not, that’s OK. No beating yourself up about it. Maybe you or a family member has been under the weather. Maybe ‘life’ has gotten in the way. Or perhaps, you just don’t know where to begin. You can start at anytime. How about TODAY?
No worries–take ‘baby steps.’
No one expects a baby to stand up one day and walk across the room. There’s a lot that goes on before a child meets that developmental milestone. They sit up, they crawl, they practice standing up in their crib. They take ‘baby steps’ towards mastering their actual baby steps.
You can take baby steps to reach your organizing goals, too.
Here are a few examples:
– Take a few minutes before bedtime to sort through and purge expired medicine.
– Sort and purge your piles of coupons while waiting for pasta water to boil.
– Schedule 15 minutes on your calendar to organize your sock drawer.
– Read a few posts on organizing blogs that pertain to your organizing challenge(s).
– Look at organizing ideas/products on Pinterest (don’t get sucked in, though!).
All of these teeny-tiny organizing projects and tasks are baby steps that will eventually get you to achieve organizing success.
I often tell my clients to visualize their organizing goal as an iceberg. Baby steps are equal to the act of chipping away at that iceberg. Some days you may feel like you’re chipping away with a hammer, other days, with a toothpick. Regardless of your tool, if you keep working at it, you will reach your goal, however challenging it may be.
You CAN get organized–I know you can. Just take a baby step–one little step in the direction of the organizing goals you have set for yourself. In the beginning, it may feel as if you’re not making much progress but let me assure you–every ‘baby step’ you take towards reaching your goal will get you one step closer to the day when you can proudly shout from the rooftop, “I did it!”
What baby steps will you take to achieve organizing success?
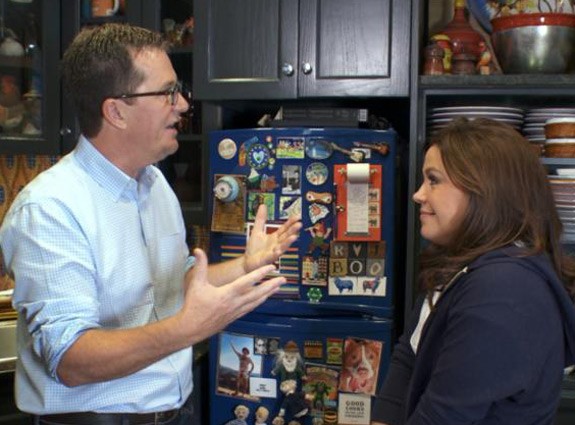
If you watch television and you have even the teeniest tiniest interest in organizing then you know who Peter Walsh is. If not, here’s the short version: Peter Walsh is an Organizing Expert from Australia who has a ‘tell it like it is’ attitude but also uses compassion and empathy while organizing with his clients. He has worked miracles in tiny spaces, as well as in the homes of hoarders. I first saw him on an organizing show called ‘Clean Sweep’ and from there, he occasionally appeared on The Oprah Show as well as other daytime shows.
I ‘Like’ Peter Walsh on Facebook. He’s always posting about projects he’s working on, easy organizing tips, and when he’ll be on TV next. So, a short while ago, he posted that he was going to be de-cluttering Rachael Ray’s home kitchen on The Rachael Ray Show. Sweet! My DVR was set. If you didn’t get to catch it last week, here’s what happened…
Rachael Ray, America’s sweetheart of the kitchen had a secret…
She told her audience that she has a tiny NYC apartment kitchen and that she’s just as guilty as other homeowners when it comes to de-cluttering her kitchen–it never happens. Cluttered cupboards, out-of-date food in the pantry and cabinets overflowing with pots and pans were just some of her organizing issues.
If I had her hectic schedule, I might not have time to de-clutter my kitchen either…
She decided to bring Peter Walsh to her home to see if he could get her kitchen organized again. Rachael gave him a quick tour of the room and then he kicked her out and started organizing. Peter started with the pantry–he emptied it, sorted the items and tossed all expired food in the trash.
Some of Peter’s pantry tips:
-Store platters upright for easier access. Use an organizing product that stores baking trays to do the same thing for platters.
-Keep flat surfaces clear. They are for food prep–not for storage.
Peter then headed to a spot most people wrestle with in their kitchen–the junk drawer. Like the panty, Peter emptied the drawer and sorted out the trash. He then grouped ‘Like with Like’ and used containers to keep ‘like’ items together.
 |
| Peter used drawer dividers like these to organize Rachael’s junk drawer |
What junk drawer items did he hold up for all the world to see? Four pair of gardening shears! Since Rachael didn’t use them very often, he promptly moved them to a different area of the kitchen.
He then removed all magnets from her refrigerator. I have a ton of magnets and children’s artwork on my fridge–Peter Walsh would have a field day with my fridge!
He and his crew worked to de-clutter the rest of Rachael’s kitchen and then brought her back in to see.
The first spot he showed her was the pantry–she loved how de-cluttered it was and how Peter had grouped ‘like’ items with like items on clear trays from The Container Store. They then moved on to the junk drawer–Rachael was so thrilled with the way it looked, she gave Peter a high-five! He had removed many of her household tools and placed them in labeled bins in a cabinet over the refrigerator to get them out of the way.
Rachael then walked over to the fridge and saw that most of her magnets were gone! She almost had a heart attack because a magnet with her deceased dog’s picture on it was no where to be found. It was quickly placed back on the fridge–organizing crisis averted!
As I often do with my clients, Peter gave ‘Organizing Homework’ to Rachael Ray…
-go through all cooking utensils
-separate out the ones she uses often from the ones she barely uses
-keep drawers neat and tidy
Peter offered up two tips and advice for the viewing audience:
1. Stop using the word LATER as in, “I’ll put that away later.” Do things as you go and he promises it will make a huge difference.
2. Flat surfaces are for PREPARATION not STORAGE.
Peter also gave the viewing audience five ‘Double Duty’ organizing products to use in the home:
1. Use an empty tissue box to store plastic bags (I do this in my own home.)
2. Use a tension rod to create hanging space under a sink
3. Thread a tab from a soda can over a hanger and hang another garment from it to double your closet’s hanging space. (I LOVED this tip!)
4. A tag from a loaf of bread can be used to wrap around and label electrical cords.
5. Use extra glass vases to corral multiples of items.
I thought this was a great segment. Kudos to Rachael Ray for being brave enough to have Peter Walsh organize her kitchen for all the world to see!
*Author’s Note: I love watching de-cluttering segments on daytime television–I pick up great organizing and product ideas all the time. But, what I’d like you to know is that de-cluttering a room takes hours–sometimes days and sometimes weeks. It looks quick on TV but what you don’t see is a multi-person crew working arduously to get the job done in a certain amount of time. When it’s just you, or you and a friend, or even you and a Professional Organizer the process takes a LONG time.
If you are de-cluttering an area of your home, don’t despair that it’s taking a while to emerge as a clutter-free space. Make good decisions, have trash bags at the ready and look for the light at the end of the tunnel. Here are a few tips to make sure your organizing efforts are taking you in the right direction.
Who doesn’t love a good top ten list? I think David Letterman made them famous but wherever you turn on the internet whether it be a newsletter, a blog, or a sales pitch, everyone has a top ten list. I even have one on my website (left under the Facebook logo).
In my last post, I wrote about the top ten helper shelf ‘hot spots’ in your home. If you’re not already using helper shelves, I hope my post gave you some inspiration to double your space on any of your horizontal surfaces.
I submitted that post to The Professional Organizers Blog Carnival for August. The theme: Top Ten Lists. Twenty-eight Professional Organizers contributed to the ‘Top Ten Lists’ Blog Carnival. That’s 280 tips! To read all 280 nuggets of organizing advice, go to Top Ten Lists – August 2012 Professional Organizers Blog Carnival.
Some of the Top Ten Lists you’ll find are:
• Ten Tips to Save Big Money on Your Food Budget
• Top Ten Ways to Say ‘No’
• Ten Strategies to Stop Procrastinating
• Ten Best Sources for Organizing Help
…and twenty-four more! (including mine)
So, if you have some time to relax this weekend and would like to pick up ‘a few’ organizing tips, kick back with some BBQ and the Top Ten List Blog Carnival. You never know what you’ll learn!