Author Archive

Do you ever watch TED Talks? I love watching them
If I get to watch at least one a day I’m a happy camper. I watch them while I’m cooking, while I’m on the treadmill, and while I’m eating lunch at my computer. If I don’t have the time, I use one of my favorite apps, Pocket to store them until I have a free 20 minutes to watch.
TED began as a conference in California in 1984–five years before the birth of the World Wide Web. TED stands for Technology, Entertainment and Design. It’s mission is to spread knowledge and since it’s inception, TED Talks have had attracted over a billion views online–there’s a lot more knowledgeable people in this world thanks to TED!
With all my TED Talk watching, I was curious as to whether there were any talks on the topic of Organizing. Well–there are! No one is sorting through papers or an overstuffed garage on stage, but the talks I’ve selected are based on an ‘organizing’ theme. Carve out time in your day to watch them–you may learn something new just like I did…
Jessi Arrington: Wearing Nothing New
In my opinion, Jessi is one brave woman. She packed seven pair of underwear for her trip to Los Angeles to do her TED Talk. My heart is palpitating just thinking about it. When she got off the plane with her very tiny suitcase, she went shopping for clothes at local thrift stores in order to “reduce the impact of her wardrobe on the environment and her wallet.” I don’t expect you to watch this and then travel light, but listening to what she has to say, might cause you to take a good look at the clothes in your closet.
Laura Vanderkam: How To Gain Control of Your Free Time
Laura Vanderkam writes about Time Management. She says, “Time is highly elastic. We cannot make more time but time will stretch to accommodate what we choose to put into it.” Basically–it’s all about priorities. Your priorities. Your schedule and your choices. Watch and listen to her and think about how you use your time…
Tim Urban: Inside the Mind of a Master Procrastinator
Do you procrastinate often? Whether you do or not, you’re going to get a good laugh out of this funny TED Talk. You might even see a bit of yourself in Tim Urban. Think about what you might be procrastinating on and watch out for the ‘monkey.’
*BONUS* Yes–I said ‘3’ in the title but this one is short–only around 5 minutes long: Mundano: Pimp My…Trash Cart?.
The unsung heroes of the organizing world are garbage men. They take away what we no longer want in our lives and are not always highly regarded for their work. Watch how one artist in Brazil took the work of Catadores, people who collect recycling, and transformed their work into an art form to be celebrated and appreciated by their communities.
Which Ted Talk resonated with you? Share your thoughts in the comments below.

SaveSave
There are no cave paintings to prove it but I suspect the first shelf was commissioned by a frustrated cave woman.
The conversation probably went something like this:
Cave Husband: “Honey, I’m home! I brought berries and bagged another buffalo!”
Cave Wife: “That’s nice, dear but this cave has no storage. Stop hunting and gathering and start building me some shelves!”
Though shelving is standard in homes today, it can sometimes feel pre-historic. That’s because pre-fabricated and pre-installed shelves don’t always fit our specific storage needs. Some of the problems with shelves are that they are:
– too shallow
– too deep
– too high
– too low
– can’t be adjusted
If you have some of these shelving issues in your closet, pantry, cabinets, or garage, here are five products to transform your shelves into a custom-designed (and organized!) wonderland:
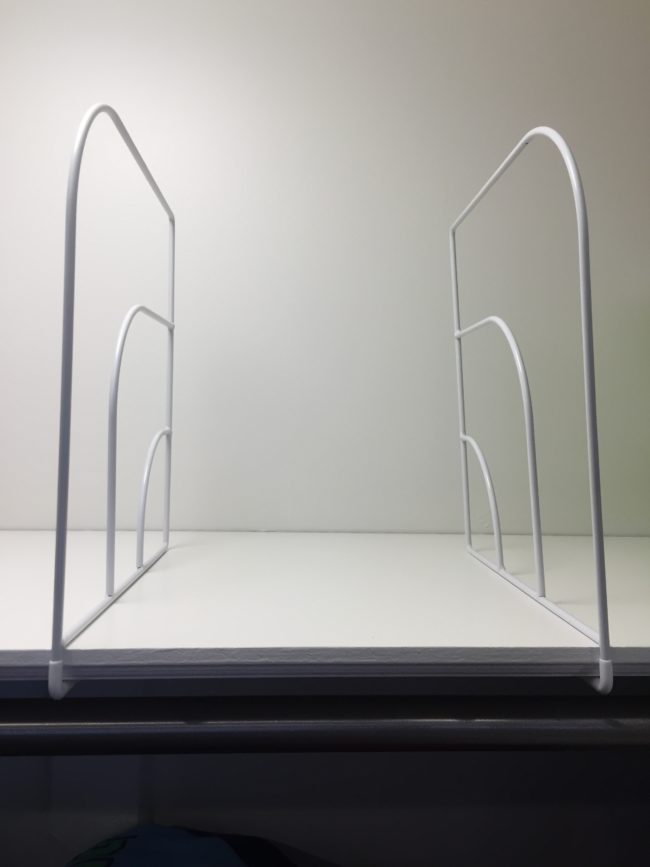
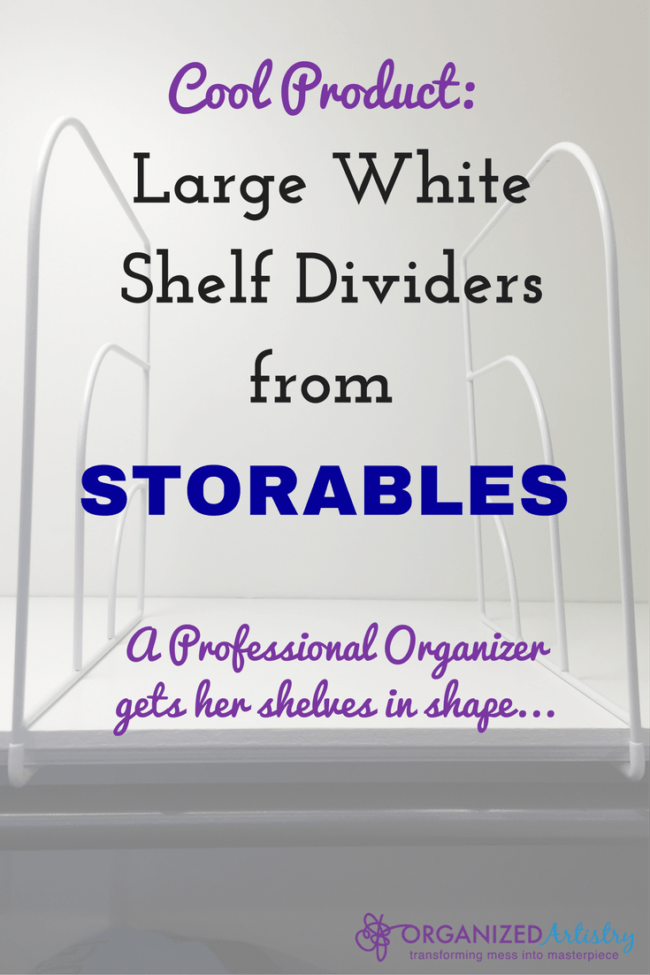
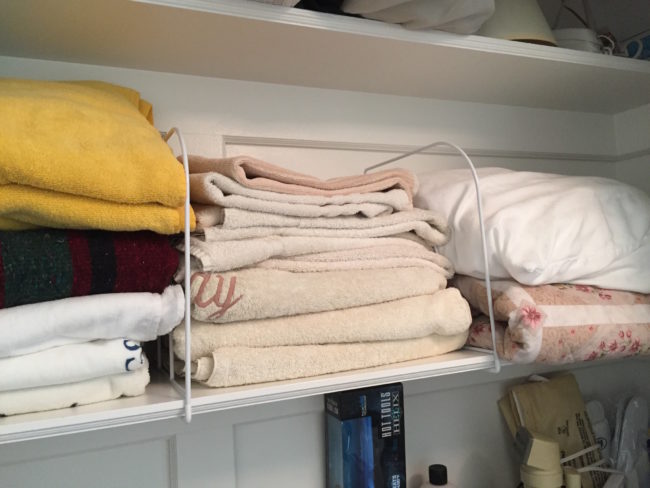
Shelf Dividers
Shelf dividers prevent stacked items from toppling over. Use dividers to separate piles of sweaters, tablecloths, or towels. You can also use them to create ‘parking spaces’ for your handbags. Dividers come in acrylic, plastic, or chrome (depending upon your style and budget).
I reviewed this product for STORABLES last month and I use them in my home. Take a peek…
Under Shelf Basket
Clustering small items on shelves leaves you with dead space above it. The Under Shelf Basket solves that problem by creating an area in that ‘dead space’ for storage. It creates the perfect spot for storing dishtowels and washcloths in a linen closet, small canned goods/spice packets in a pantry, and food wrappings (like aluminum foil and waxed paper) on a cabinet shelf.
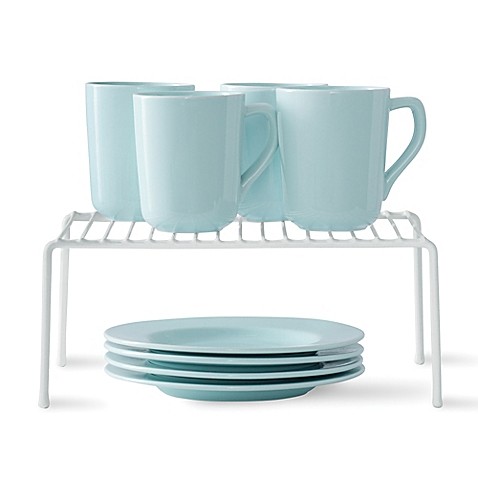
 Helper Shelf
I love Helper shelves! I have over ten of them currently in use in my own home. They turn wasted shelving space into prime real estate for dishes, canned goods, or any stackable item. A helper shelf offers two levels of storage–below (for small items) and above (for larger items).
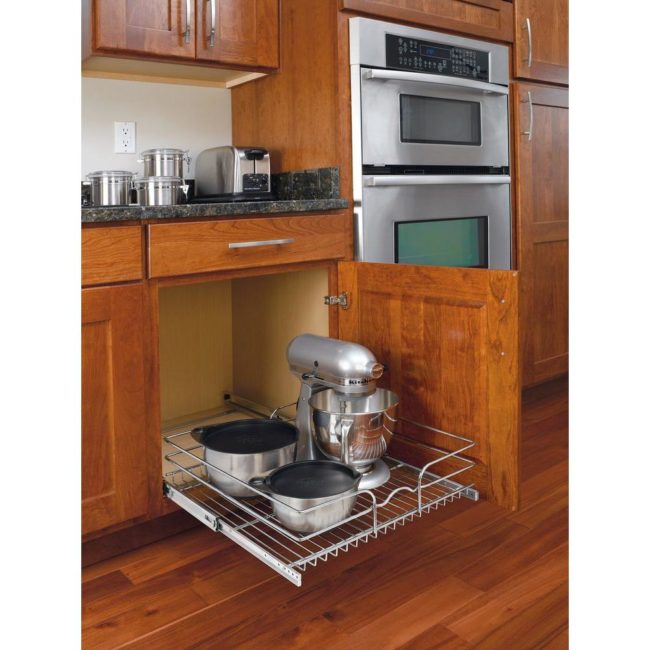
 Pull Out Shelf
If you’re tired of rummaging for items at the back of your shelves, consider a sliding shelf (also known as a rolling or pull-out shelf). It pulls out so you can reach what you need that lives in the back of your shelving/cabinet and then pushes right back in. Great for items that are heavy and not often used.
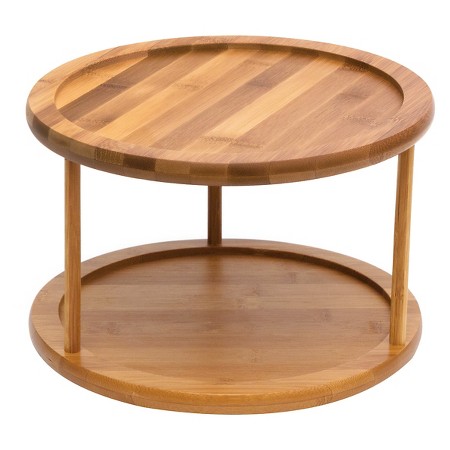
Lazy Susan
This product is perfect for those hard-to-reach corners in a cabinet or shelf. You can purchase a lazy susan with one or two levels depending upon your needs. In my home, I use them for vitamins and spices–both located in tight cabinet spaces. Spinning the lazy susan to reach and retrieve what I need makes my life a whole lot easier!
Use any of the above products to optimize your home’s shelf space. When your spouse calls to tell you he’s bringing home berries and buffalo–you’ll be prepared…
Which product would you like to try on your shelves?
SaveSave
Normally, I do product reviews of organizing tools I use in my work and personal life but today I am writing my first Sponsored Post! The lovely folks at Storables contacted me a while ago and asked me to review a product of theirs–my choice. Hmmm…what to choose? This was like letting a kid run wild through the aisles of Toys ‘R Us…
I had so much fun perusing the pages of their website. My pick? A product I had never used before–a shelf divider. Today’s ‘Cool Product‘ is: Storable’s Large White Shelf Dividers. I am doing this review in exchange for the product and a gift card.
Big thanks to my sponsor, Storables for reaching out to me with this opportunity. All words, opinions, and photos are my own.
If you’ve been following my blog for the past year, you’ve read that I just went through a major home renovation. We have a lot of new closets (yay!) so when Storables told me I could review any product from their website, I gravitated towards the ones that would work best in a closet. I had always seen shelf dividers similar to these in pictures and thought they were pretty ‘cool’ so I selected their Large White Shelf Dividers. A great idea–that is until they arrived and I realized they were too big to use in my clothes closet as well as my husband’s. Oops. (They do come in a smaller size in Chrome.) I’m a stickler for measuring but I think my excitement got the best of me…
But, have no fear! I found many uses for this product in my home besides my clothing closet. All I did was use some ‘out-of-the box’ or in this case ‘out-of-the-closet’ thinking.
Here are four ways the Large White Shelf Dividers from Storables worked brilliantly in my home:
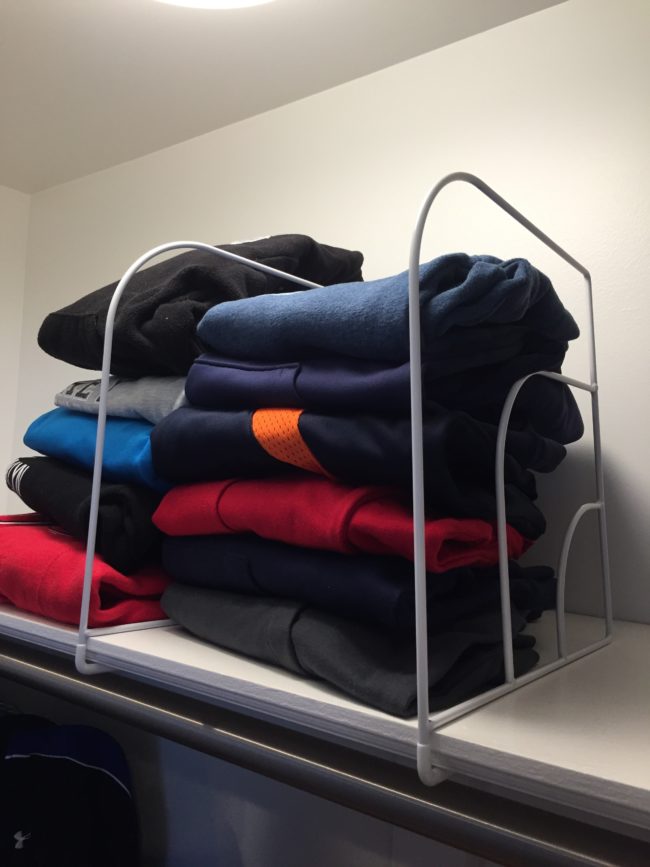
My Son’s Closet
The kid has a lot of sweatshirts. Piling them more than 4-5 high is useless because they’re just going to topple over. Enter Storable’s Large White Shelf Dividers. This product makes it easier for my son to put away his own sweatshirts. Wait, did I just say that? Ha ha ha! I must be dreaming…he’d prefer to pile them on his chair instead. Not folded. Ummm…thrown over the chair. OK–this product is for me, not him–I freely admit it! It’s going to make MY life easier!
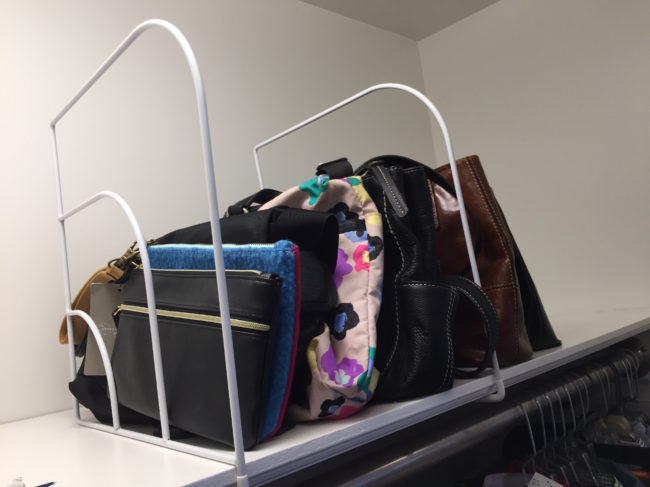
My Purses
I’m pretty practical–I don’t have a huge collection of purses. I use the same purse everyday for Fall/Winter and a different one for Spring/Summer. I own a few larger ones for carrying more and a few dressy ones for special occasions.
On the flip side, I have worked with clients who own 50-100 purses. And that’s after we’ve purged the ones they don’t like/need/want anymore. Whether it’s a collection made up of 5 or 50 purses, no woman wants them piled one on top of another in her closet. It doesn’t look good, piles can cause damage to a handbag, and it’s challenging to find the purse you want when you need it. See below how beautifully the shelf dividers function? These shelf dividers act as ‘parking spaces’ for purses. If these dividers work for my tiny purse collection, think about how well they’d work for someone who really likes purses!
The Linen Closet
Towels, sheets, blankets–if there’s more than one person and one bed in your household that can add up to a lot of linens. Piled high. Toppling over each other in your linen closet. Not with these Large White Shelf Dividers. The shelf dividers keep those linens piled high but not falling over onto another stack.
The Pantry
This may be my favorite use for the Large White Shelf Dividers. I use paper bags from Whole Foods and Trader Joe’s for recycling and paper organizing projects with clients. I need easy access to them and a ‘front-and-center’ place to store them. Since my recycling lives in my pantry before being taken outside, I created a space in my pantry for the paper bags. I slid the shelf divider onto a shelf in my pantry close to a wall to create the space for the bags. When I get more bags, I can adjust the divider to accommodate more. This is working beautifully and will make my life much easier!

So, if you have large shelves with spaces that need dividing or maybe you have piles of sweaters/towels/purses that are constantly topping over each other, consider purchasing Shelf Dividers (in any size or color you need) from Storables. As a Professional Organizer and a homeowner, I recommend it!
How would you use Storable’s Large White Shelf Dividers in your home?
SaveSave
Remember when you were a kid and you couldn’t wait for that holiday season Toys ‘R’ Us catalog to come in the mail? The excitement! The anticipation!
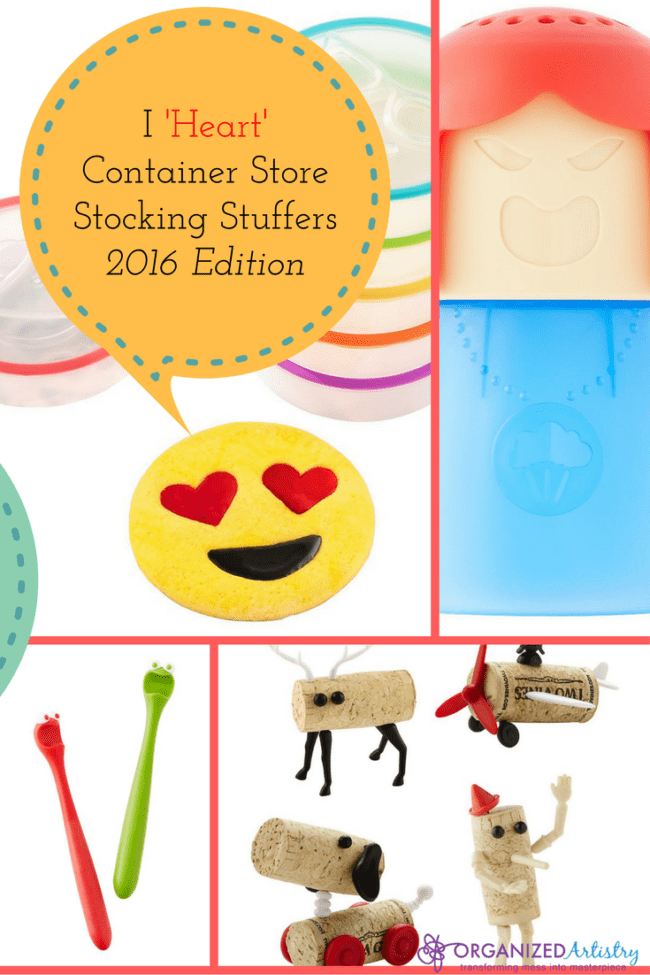
Well, that’s how I feel about The Container Store’s Stocking Stuffer Collection catalog. I know sometime after Halloween it’s going to find it’s way through my mail slot. Lucky for me, I live ten minutes away from The Container Store in Paramus, NJ but instead of driving over there ahead of time, I wait for the catalog. I like to flip through the pages and pick out the items I like before heading to the store to see and possibly buy them.
What I found most interesting about this year’s Stocking Stuffer collection is that there are very few ‘organizing’ products. Most fall into the fun/kitchy/useful item category. Some I looked at and didn’t really understand their purpose. That’s OK–I’m sure somebody does–and that’s who will buy them! Something for everyone…
Last time I did a Stocking Stuffer Roundup was in 2013. Some of my favorites included a Dressing2Go container and a vintage rubber ducky shower cap. It’s been way too long–it’s time for another roundup!
I’d be writing until next Friday if I featured all of The Container Store’s Stocking Stuffers so I picked a handful to share with you. They’re split into three categories: Useful, Cute & Fun, and Makes You Go Hmmm…. If you’re in need of some stocking stuffers or small gifts for the people in your lives, consider these and the others in the collection…
USEFUL
Maggrip Car Vent Phone Mount $ 9.99
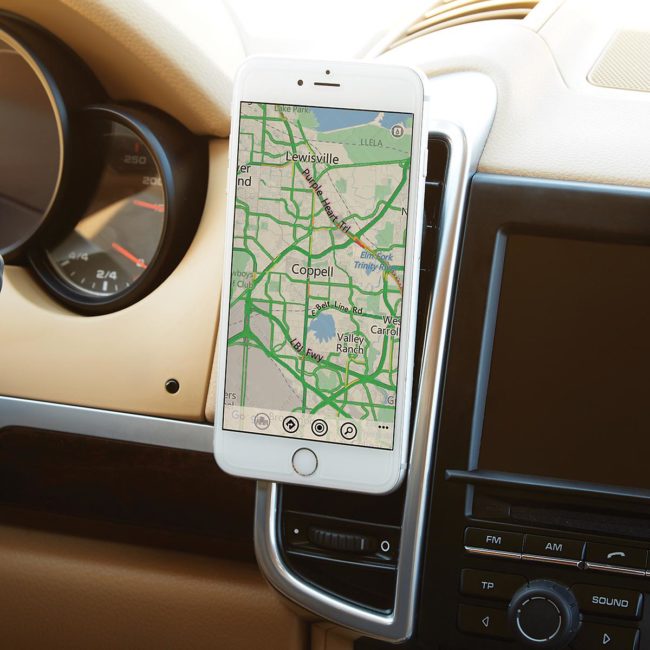
This product secures a smartphone to a car’s air vent for clear, safe viewing. Has 5-star rating on the website.
ToyDriver Screwdriver $ 9.99
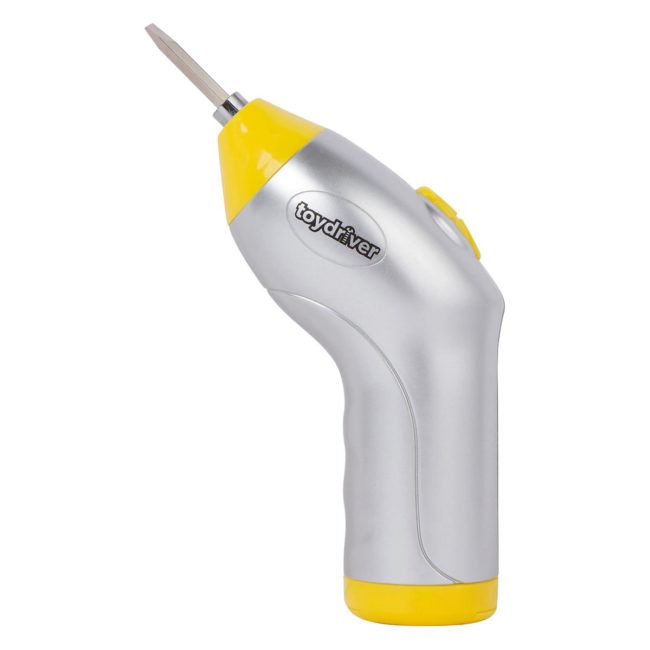
My kids are 6.5 and 10 but I remember when they were little and EVERY toy had a battery. And every toy had a battery compartment held together by the tiniest screws. Boy, could I have used this a few years ago! Comes with a flat head and Philips head bit. My cousin had a baby last month and I am considering sending this to her!
Pocket Monkey $ 11.99
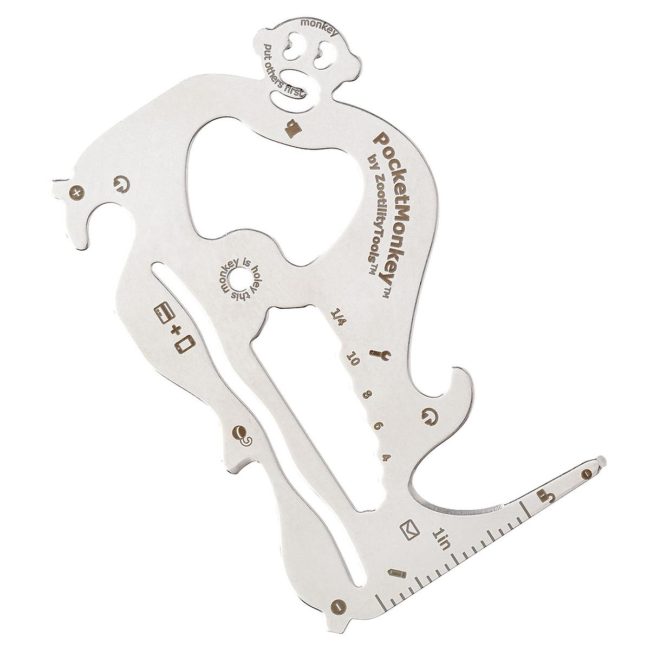
It’s a bottle opener. It’s a multi-head screwdriver. It’s a phone stand, an envelope opener, and much more. TSA-Compliant and thin as a credit card. You never know when you’ll need one of it’s many features…
Flint Retractable Lint Roller $ 8.99
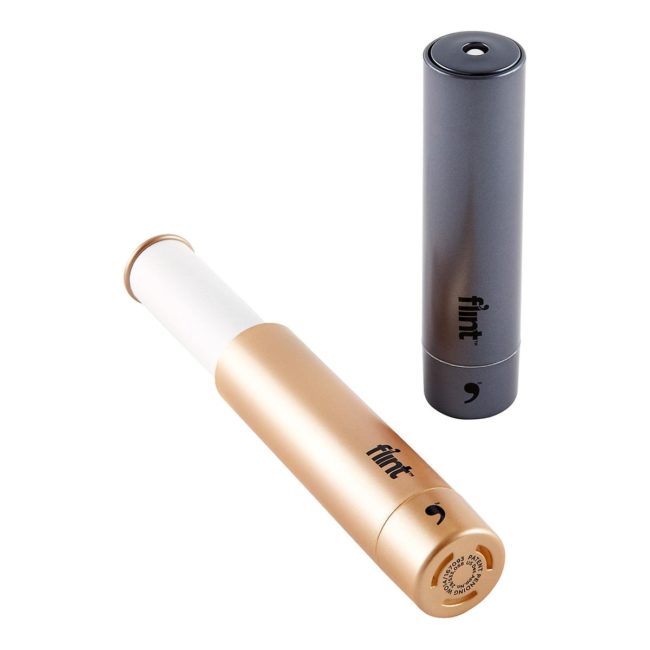
Ever go to a dog lover’s home and come home with half the dog on your pants? Keep this in your purse, glove compartment, or travel bag and be dog-hair free! Works for white lint napkins on black pants and anything else your clothes can be covered in. Comes in Slate Gray and Copper. Refills sold separately.
CUTE & FUN
Angry Mama Microwave Cleaner $ 9.99
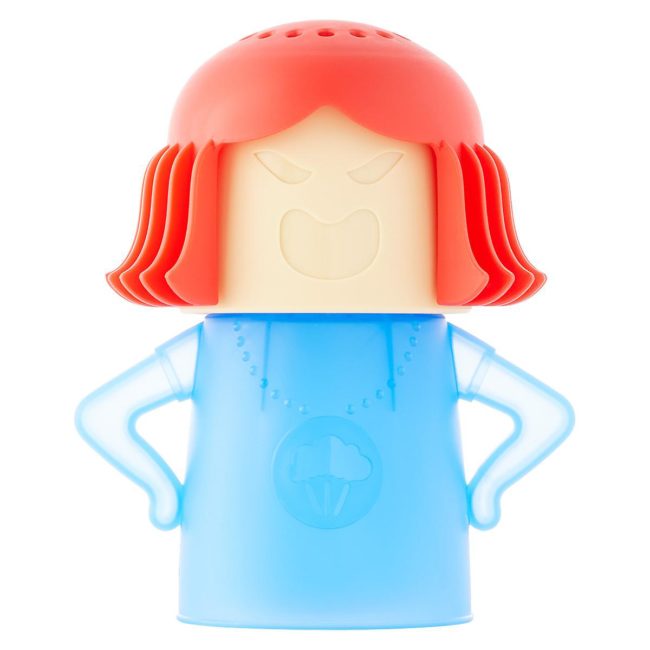
I usually use lemons in hot water to steam-clean my microwave but wouldn’t this be a whole lot more fun?
Emoji Cooking Stamps $ 5.99
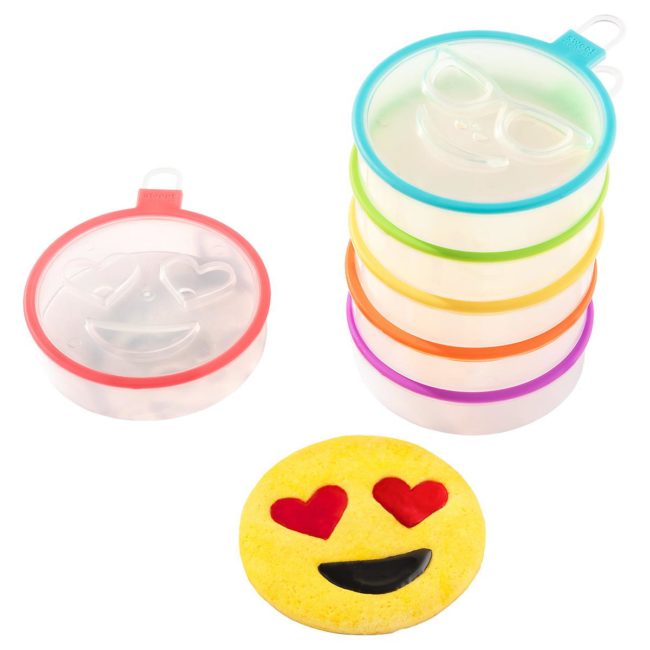
Emojis are all the rage now! Take a departure from baking gingerbread men and snowflakes this season to create some cool kid-friendly cookies.
Corkers Cork Decorating Kit $ 5.99
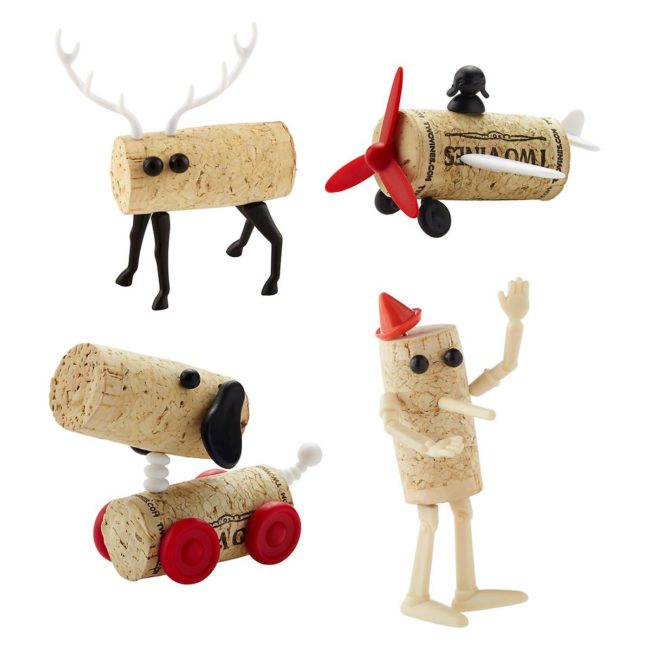
I’m allergic to wine so I don’t exactly have corks hanging around my kitchen. But, for those of you who do, here’s a cute ‘adult’ art project for you! Choose from airplane, deer, dog and pino figurine. A nice add-on if you’re bringing a bottle of wine to a party.
Beepegg Timer $ 19.99
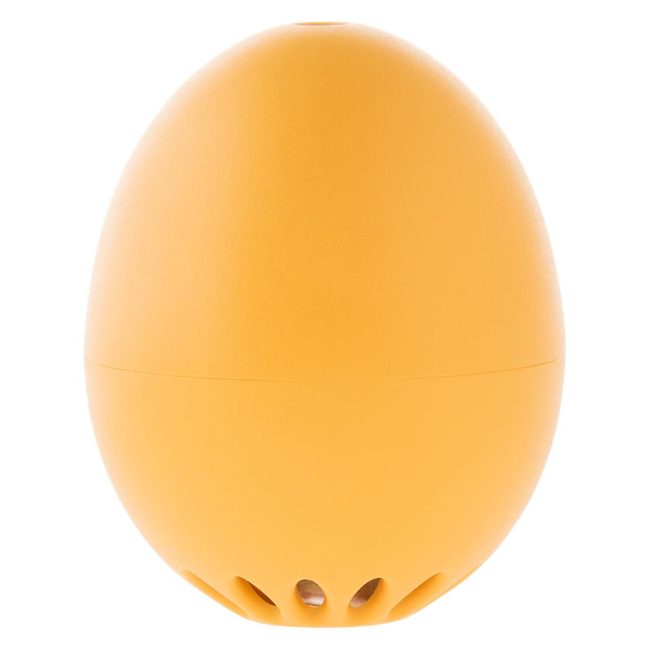
A bit pricey, but if you like soft and hard-boiled eggs, this could be a good investment piece for your kitchen. Store in the fridge with your eggs for best results. You’ll always know where it is when you need it if you store it near your eggs!
MAKES YOU GO Hmmmm…
Oven Pull Monster $ 2.99
This seems useful but it’s not the most friendly-looking kitchen gadget out there. It looks a little freaked out–as if it knows it’s about to go head first into a hot oven. For the chef in your life with a good sense of humor…
Handbag Raincoat $ 19.99
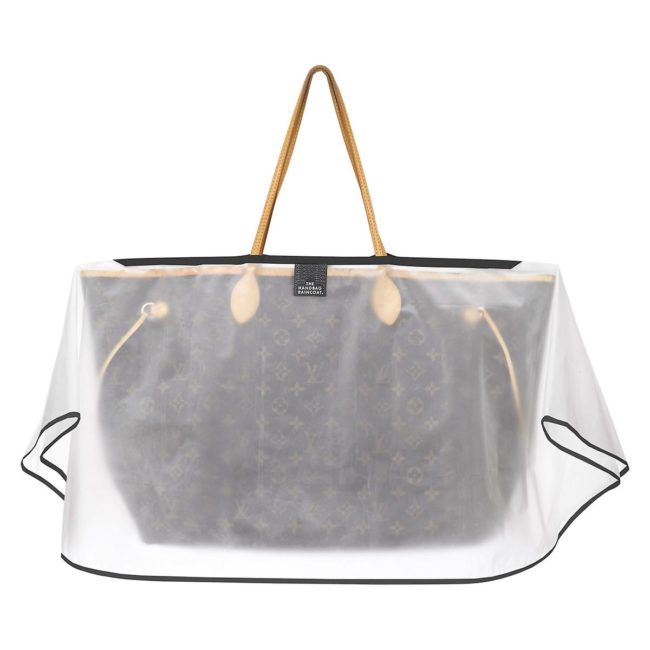
I get it. It’s raining. You don’t want your handbag to get wet. But, a raincoat for a handbag? Where does it drip dry? It comes with a pouch but if you’ve ever tried to get an umbrella (wet or dry) back in it’s ‘pouch’ then I can’t imagine trying to do the same with a handbag raincoat. A bit pricey for what it is but if you carry an expensive bag and live in a rainy area, it could be worth it.
Wine Glass Shade $ 12.99
Like I said above, I’m allergic to wine. I own wine glasses for when company comes over but I never thought of ‘setting a mood’ with one of them. For the wine enthusiast in your life…
Poo Pourri 2 oz. – $ 9.99
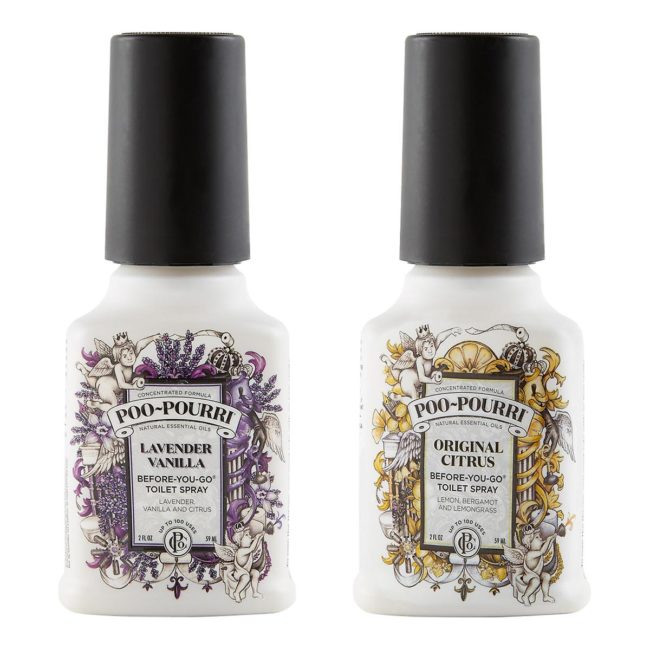
OK, Container Store. You had to go THERE? Travel-sized for a purse, backpack, or diaper bag. What disturbs me most is that on this page (and all other pages) on The Container Store website, there’s a spot where you can upload a picture of the product in use with the hashtag #containyourself. I dare anyone to buy this product and upload a picture of themselves using it!
For more of The Container Store’s Stocking Stuffer Collection click here. There are stocking stuffers for kids/teens, pets, travelers, techies, chefs and many others in your life.
If you’re driving to The Container Store to peruse their stocking stuffers, consider donating an unwrapped book, toy, gift card, or toiletry to their Holiday Hugs program. They’re partnering with children’s hospitals around the country to deliver ‘Holiday Hugs’ to their patients. Program ends December 18th.
Three hundred and twenty-five days until next year’s Stocking Stuffer catalog!
I’d love to know–which stocking stuffer is YOUR favorite? Share in the comments below…
SaveSave
SaveSave
This October marks the 7th anniversary of my blog!
In the Spring of 2009, I attended the NAPO Conference in Orlando and signed up for a workshop on how to start a blog. I loved to write and I enjoyed sharing my organizing knowledge–blogging married those two loves together.
I started my blog shortly after my then three year old started preschool. I began on the Blogger platform and a few years ago my blog moved to WordPress coinciding with the redesign of my website. I reviewed ‘Cool Products,’ offered ‘Organizing Quick Tips,’ and wrote about anything I thought my readers would find helpful. Then child #2 came along and I did my best to keep up with blogging. Three years later (when he, too went to preschool) I decided to resurrect and complete a ten year old manuscript and self-publish a book. Still kept up with my blog. It was a challenge–but when you’re writing a book, the writing somehow just flows off your fingertips.
Recently, I was reviewing my posts and noticed I hadn’t written one for my 5th or 6th anniversary. I didn’t write a 5th anniversary post because I was heading towards the self-publishing finish line and needed to focus to complete the enormous task. The 6th anniversary post never got written because I stopped blogging. Completely. Not one post for fourteen months. What happened?
A home renovation/addition project.
We purged our home, packed it all up and moved out for nine months. My brain was making so many renovation-related decisions and adjusting to living in temporary quarters–I just had no brain bandwidth for blogging. Took it off my plate completely. It was a bit weird–not writing at all. But sometimes in life we must put certain tasks on the back burner to accomplish a goal.
It took fourteen months, but in July of this year I got back to writing for my blog. I wasn’t sure how I’d jump back into the blogging pool so I decided to write about what I knew–my home renovation/addition experience. I thought about my experience and the knowledge I could pass on to my readers and the words started to flow. After a year’s+ hiatus, I had some time to think about the steps I wanted to take to move my blog forward.
In past ‘blogiversary’ posts, I’ve talked about my blogging goals for the year ahead. Here are a few for 2017…

Boosting Pinterest traffic to my blog
I ‘heart’ Pinterest. I could be on that site all day if I had the time! There is a wealth of information in those millions of pins for both personal and professional use. I am planning on joining a few group boards and posting my blog posts to them to grow my blog traffic. I’m learning how to write more descriptive, keyword-rich pin descriptions for my blog posts and communicate more with those who are pinning them. Did I mention how much I ‘heart’ Pinterest?????
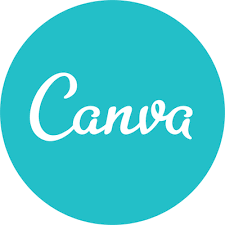 Creating Images in Canva
Canva is an online tool used for designing professional-looking graphics. If you’re on Pinterest or read a ton of blogs, you’ll see many utilizing Canva or similar tools to create eye-catching images for their blogs, later to be pinned and posted to social media sites. I used to be a graphic designer and I wasn’t happy with the look of my blog photos so I started learning about and using Canva. My first ‘creation’ can be found here.
Creating a Blogging Calendar
I’ve tried this in the past but it hasn’t worked for me. Maybe I wasn’t using the right calendar? Maybe I’m not spending enough time on the planning process? This is something on my to-do list for December so I can start in January.
Stop Comparing Myself to Other Bloggers
This is a tough one. I read many blogs and I wish I could have a larger readership and stunning photography like them. I’ve come to realize that for many bloggers out there, their blog is what they do for a living. That’s their main focus and they can create beautifully written and photographed posts 5-7 times a week. My situation is different. I work when my kids are in school. I travel to and work with clients for a large chunk of that time. I just started a newsletter. I’ll be adding Virtual Organizing services to my business model in 2017. I am working on the three goals I stated above. I blog when I can. I just have to keep reminding myself that there are only 24 hours in a day and that I’m moving my blog and my business in a positive direction…
It’s not easy to come back from any kind of hiatus. I’ll be coming back to blogging slowly–keep an eye out more pretty pics, ‘cool products,’ gotta-tell-a-friend ideas and of course, organizing know-how.
You don’t have to wait ’til January 1st to set goals. Do you have any goals for your blog, business or personal life? Share them in the comments below.
SaveSave
Stylists recommend matching your shoe and sock color to make you look taller. As a petite woman, I don’t want to appear any shorter than I already am so I try to match my sock color to my pant or shoe color. Sometimes all three are the same color and I’m feelin’ pretty tall!
Then one day, I left the house wearing black pants and navy blue socks.
Some of you might say, ‘So, what?’ Some of you might be shrieking in horror. I was shrieking.
When I got home later that day, I looked closely at my sock drawer. One side was for lighter colored socks and one side was for darker colored socks. The lighting in my bedroom wasn’t that fabulous. I could see that my navy blue and black socks (especially the knee-hi’s) were looking a lot alike. Something had to be done to prevent another fashion faux-pas!
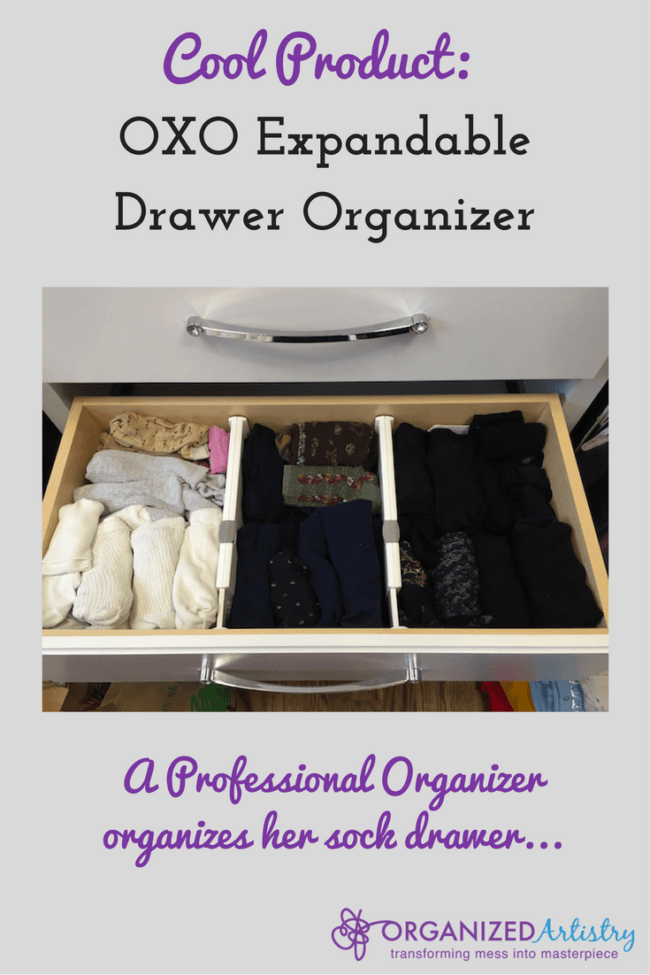
Now, this scenario pre-dates my professional organizing days by about five years, but organizing is in my DNA so I set out to find a solution. I needed an easy, low-to-no-cost product that would separate my socks so I could find the color I needed quickly. I ended up getting a box from my neighborhood liquor store, took careful measurements and cut the cardboard. Twenty minutes later, I had sock drawer dividers!
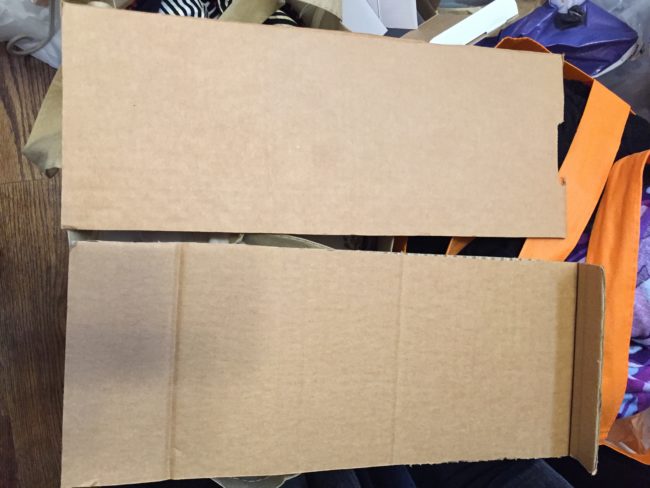
Almost twenty year old cardboard!
Believe it or not, these pieces of cardboard survived three moves and many sock drawer purges. But after close to twenty years of service, I decided to retire my cardboard drawer dividers. We had recently renovated our home and the built-in dresser in my new closet had different dimensions. It was time to look for an upgrade.
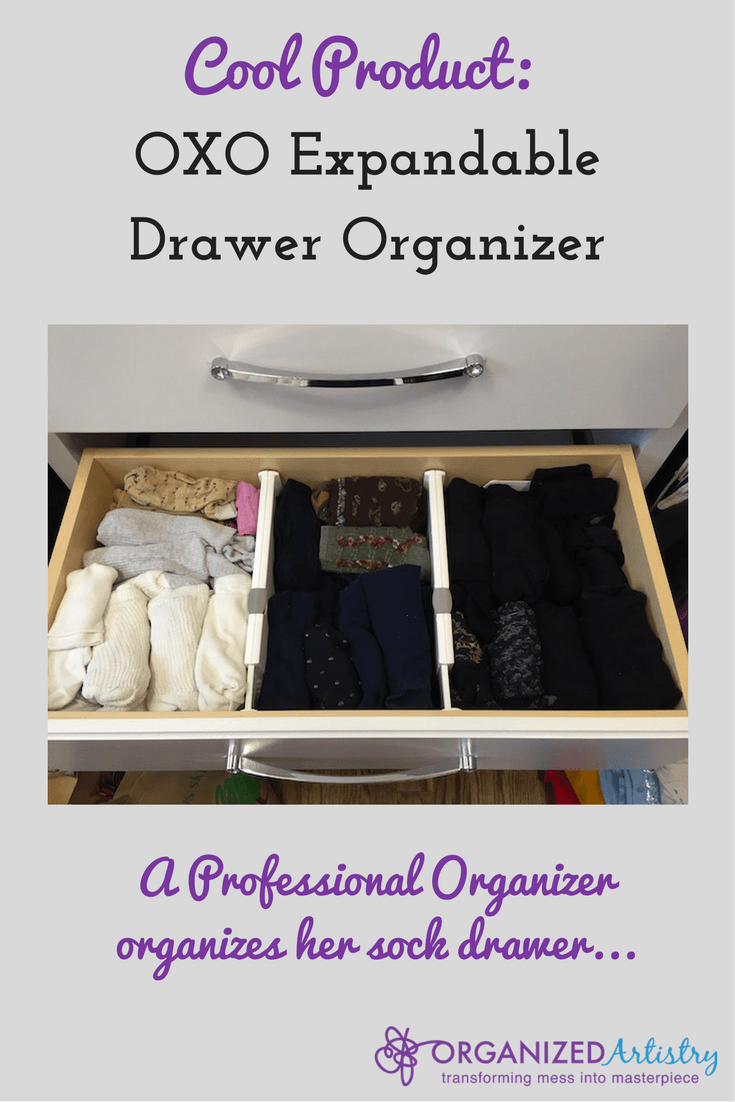
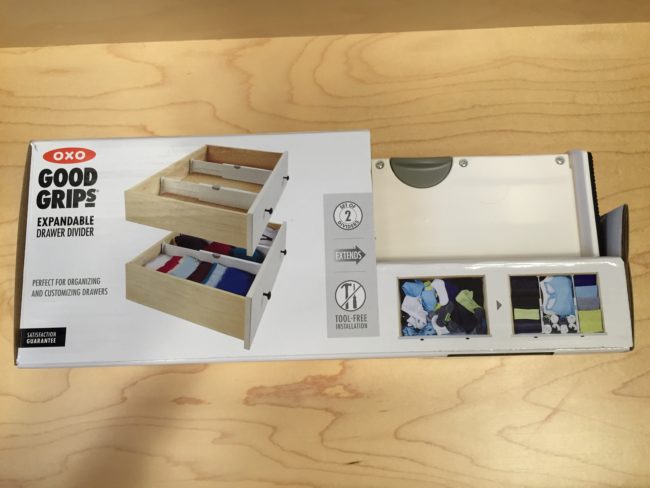
I took to the internet to assist in my search for souped-up drawer dividers. After reviewing sizes, colors, and pricing, it was a no-brainer. It had to be an OXO product–The OXO Expandable Drawer Organizer (set of two).
I love OXO products. To put it bluntly–they’re made well with ergonomics in mind. I love, love, love my OXO POP Containers and other OXO kitchen tools I own. For years. Still working. Still in great condition.
From their website:
“OXO is dedicated to providing innovative consumer products that make everyday living easier. OXO was founded on the philosophy of Universal Design, which means the design of products usable by as many people as possible.”
But, did I really need an OXO product in my sock drawer? Once you install the drawer dividers, they just sit there doing their dividing job–right?
Here’s why I purchased the OXO Expandable Drawer Organizer…
Reputation – OXO has a long-time reputation for creating products with the user in mind. They’ve been around since 1990 and continue to create innovative tools for everyday life.
Design – I liked the way the dividers looked. They’re white and match my drawers. They have rubber ends so they don’t damage the inside of drawers.
Construction – OXO makes their products out of sturdy plastics and these drawer dividers are no different. When I took them out of the box, I felt the expansion mechanism was sturdy and would hold up to repeated changes in size if I needed to use them elsewhere someday. I was willing to spend a little more money on them because I felt they would last.
Reliability – I’ve had OXO products in my kitchen that were given to me as bridal shower gifts. Sixteen years later, I’m still using many of them. If kitchen tools I use multiple times a week can last almost two decades, so can drawer dividers.
Bonus: I also had a 20% off Bed Bath and Beyond coupon which made the purchase a little easier on the wallet. And it makes me happy to look at them every time I open my sock drawer. There’s something to be said for that, too. I’ve been using them for six months and no complaints from me or my socks. They’re working well, looking great and my black and blue socks live on opposite sides of the divider.
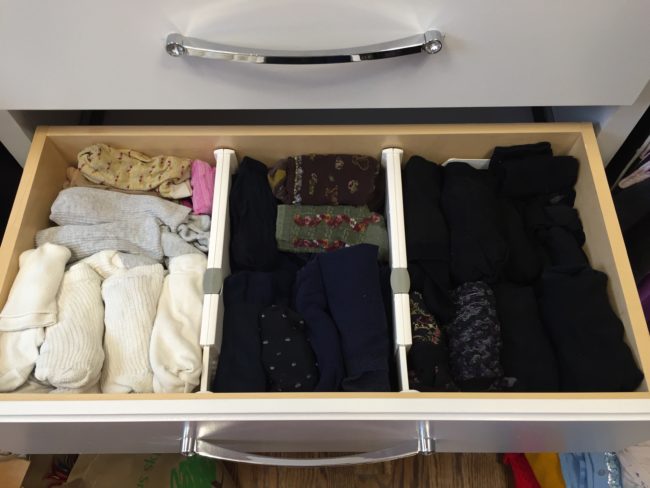
My organized sock drawer!
So, if your socks drawer needs some organization, consider using one or two sets of The OXO Expandable Drawer Organizer. It’s my latest ‘Cool Product’ pick.
What have you done to make your socks easier to find?
SaveSave
There is a small but growing group of Professional Organizers who are also published authors. We like to write. We like to organize. We like to write about organizing–what a surprise! My colleague, Professional Organizer Vickie Dellaquila, CPO, CPO-CD of Organization Rules, Inc. is one of those Professional Organizers. She is the author of, Don’t Toss My Memories in the Trash: A Step-by-Step Guide to Helping Seniors Downsize, Organize, and Move.
Vickie recently adopted a mascot for her business and her name is Ophelia. She even has her own Facebook page! Ophelia offers answers to people’s organizing questions and just started doing book reviews. When I saw her post looking for books to review I popped one in the mail for her to read. Boy, am I glad I did. Although my wedding organizer book is not exactly about the home, time, and paper organizing most Professional Organizers do in their everyday work, I think she still enjoyed reading it.
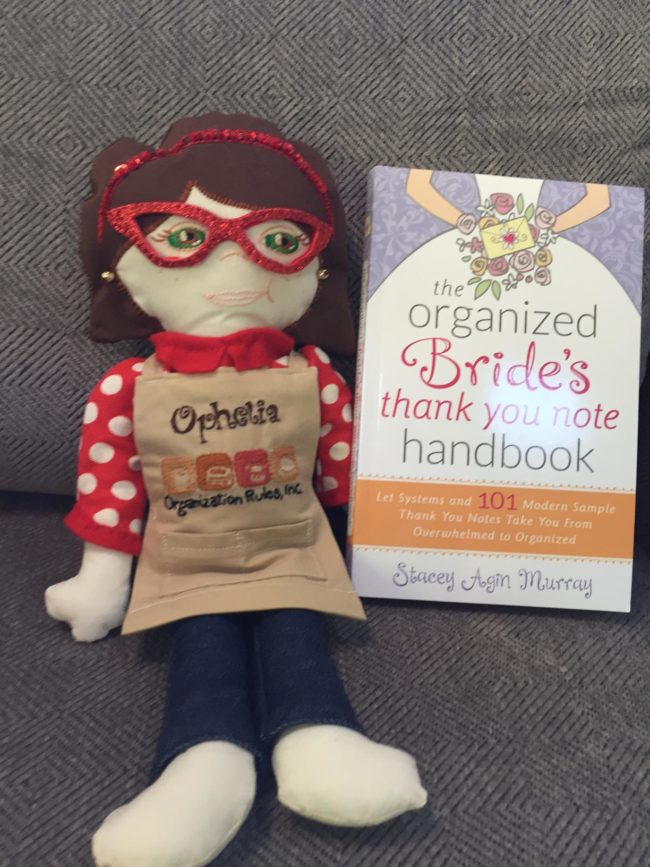
Her review…
“Oh how I wish I had this handbook when I got married! The Organized Bride’s Thank You Note Handbook by Stacey Agin Murray is the perfect guide for overwhelmed brides seeking assistance in the daunting task of writing thank you notes. Almost every bride I know has complained about this task specifically due to the amount of legwork and trying to think what to write to people. Stacey has it all here for you in this handbook down to keeping track of who bought you what present and for what occasion (engagement, bridal shower, etc.) to great examples that are personalized, thoughtful, and truly will show your appreciation for each of your wedding guests. I highly recommend The Organized Bride’s Thank You Note Handbook to brides out there or newlyweds who are dreading the thank you note writing task. This handbook will guide you through every step of the way and keep you organized with the built in charts. Please do yourself a favor and order your copy before starting your thank you notes!”
Thanks, Ophelia (and Vickie, too)!
I’ll be attending the NAPO Conference in Pittsburgh in April 2017 which is Vickie/Ophelia’s hometown. I’m looking forward to meeting them and thanking them in person for their lovely review of my wedding organizer book, The Organized Bride’s Thank You Note Handbook.
Have you read a book lately? Help an author by writing a review on Amazon or Goodreads–they’ll be grateful for your time and words.
SaveSave

As you may have read in my past three blog posts, last year I was a little busy with a home addition/renovation project. I knew it would be a challenging and rewarding process–and it was! But, there was one thing I didn’t realize would need to happen after we had moved back in…
I was going to have to find new ‘homes’ for almost everything we owned.
Although I don’t formally ‘move’ clients as part of Organized Artistry’s list of services, on occasion, I have helped a client unpack their belongings into a new home. Within that process, I have assisted clients in finding new ‘homes’ for their kitchenware, linens and anything else that needed a home. With all the work that went into making our new house safe and beautiful, it never dawned upon me that I was going to have to figure out new ‘homes’ for everything we owned. Our house barely looked the same after the renovation/addition. Much of our old furniture was gone. We had a brand new kitchen with ample cabinets and pull-out drawers (squee!)–new closets, vanities, and storage options, too.

One of the storage pieces we created–four drawers to hold BBQ and entertaining pieces.
Yup. I’m a Professional Organizer and ‘finding new homes for everything we owned’ had not made it to my To-Do list.
We had lived in our pre-renovation house with mostly the same furniture and storage systems for fourteen years. For fourteen years the tape measure, the check book, and most of what we owned had ‘lived’ in the same place. I always knew where to find things when I needed them. Now, after almost six months in our house, it’s more like…
“Honey, where’s the (fill-in-the-blank)?
or
“Honey, do you remember where we decided to put the (fill-in-the-blank)?
or, once in a while it’s more like…
“WHERE IS THAT (fill-in-the-blank)? I COULD SWEAR I PUT IT IN (that drawer, that closet, that room)!
I’ll be honest–this has been pretty frustrating for me as a person and for someone who finds ‘good homes’ for people’s belongings for a living! It has left me discombobulated and a little freaked-out when I can’t find something.
Like I tell my clients, nothing happens overnight and I have to remind myself of that, too. A task this large needed to be broken down into smaller, more manageable chunks. The joke is, “How do you eat an elephant?” and the answer is, “one bite at a time…” It’s an ongoing process. I broke it down into three parts: Primary, Secondary and Tertiary (like on the color wheel). Here’s how I’ve been breaking down the task to meet this challenge head on…
Primary: What Did I Do First?
• On move-in day, I set up a bin in my new kitchen–large enough to accommodate papers. Any important papers that I needed to not misplace and have in front of my eyeballs went in there (ex. forms from school, our packing list, a wedding invitation, etc.)
• I thought of what rooms/hotspots HAD to be organized for us to function as a family in the days and weeks post move-in. Those turned out to be the kitchen/panrty, the kid’s homework/supply station, basic bedroom, bathroom, and home office set ups, current season clothing and sporting equipment (for my two boys).
• The tape measure and checkbook found semi-permanent homes!
Secondary: Three Months later–a few examples…
• I have been slowly determining where items should now ‘live’ based on our new habits and the flow of the house.
• Important papers used to hang on my fridge and I kept some in a magazine holder on my kitchen counter. Now I keep them in plastic sleeves in a binder that lives in one of my kitchen cabinets. It’s now a ‘home’ for papers I need to look at regularly (schedules for recycling, school, sports, phone lists, etc.)
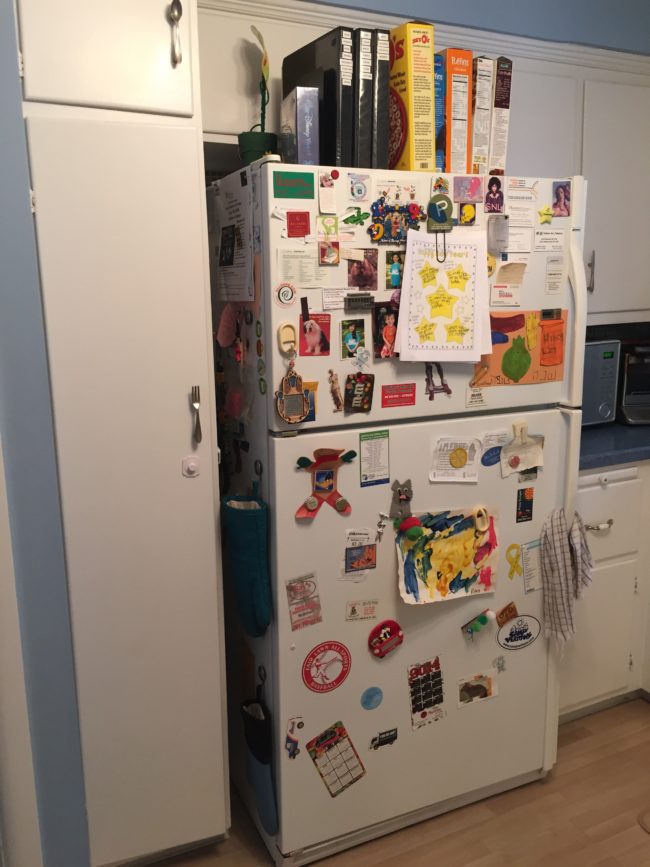
This is what our old fridge used to look like! We had a ton of fridge magnets–my kids loved them!
• My kids needed a place to put their most popular games/puzzles/books on the first floor of our home. Certain kid games/puzzles/books now live in a dresser that is being used as an entrainment console until we get a new one. Other games/puzzles/books live in the basement and kid bedrooms.
Tertiary: Tasks left on the to-do list…
• Holiday, BBQ/Entertaining items, Art Supplies are still in boxes. If I need them, I know where the boxes are and what’s inside of each since my packing list perpetually lives in the bin described above. Still haven’t figured out where everything will live–especially since we’re still in need of some furniture that will serve as storage pieces for the items in these boxes. Find the turkey platter, fondue pot, and glitter glue? No problem. Where to store it for the next few years? I’ll have to get back to you on that one…
• When the movers brought some of our boxes up to the attic, they were put up there in random spots. Once the weather gets cooler, hubby and I can organize them better–especially the bins of seasonal kid clothes. Those can be a beast!
• I am still slowly determining where items should now ‘live’ based on our new habits and the flow of the house. I think we’re going to have to live in the space for a year–four seasons–to know where everything should live.
I’m taking it slow and if you’re in a similar situation–you should, too. Find a fork and eat that elephant–one bite at a time!
What have you had to recently find a new home for in YOUR house?
SaveSave
SaveSave
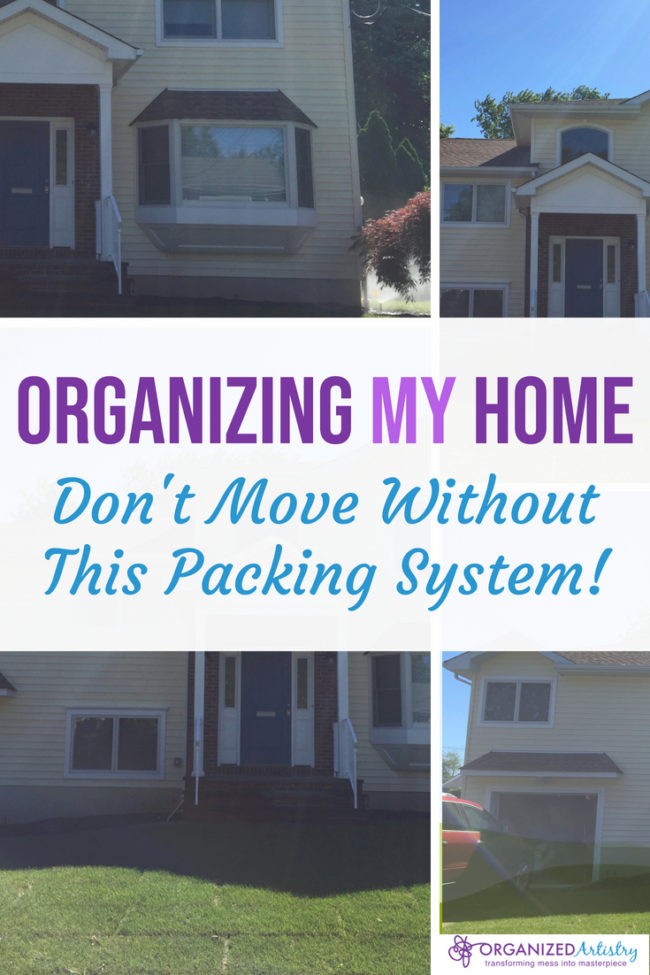
If you’ve been following my recent Organizing MY Home series, you know that I moved twice in one year due to an addition/renovation project. Part of what made such an upheaval bearable and organized were a few key moving tips I created for myself and a packing system that helped us find anything we needed while we were living in our rental space.

This wasn’t your typical move from one home to another. We were packing up our entire house, moving it to a rental property but not opening all our boxes and setting up to stay. Our plan was to only open boxes of items we truly needed and keep most of the rest sealed until we returned to our renovated home.
As a Professional Organizer, I have offered clients packing ideas but never for a double move. I also hadn’t packed up and moved myself for many years so I took to the internet and did some research on line on how best to pack an entire home. I came across a few posts, mostly from military wives who had lots of practice packing and relocating their households and gleaned some ideas from their experience. I quickly learned that writing the contents on the outside of the box is a magnet for unscrupulous movers. And what if we stacked the boxes so we couldn’t see what was written on the outside? I needed some other ideas. I then came across a post online that would help me. It gave me some good ideas that I adapted to our particular situation.
Based on ideas I read online, I chose to create a numbering system that would enable my husband and I to track and quickly locate of all our belongings during both moves. My husband created the cover sheet and tracking sheets of the packing list and left a few lines blank for anything we needed to add.
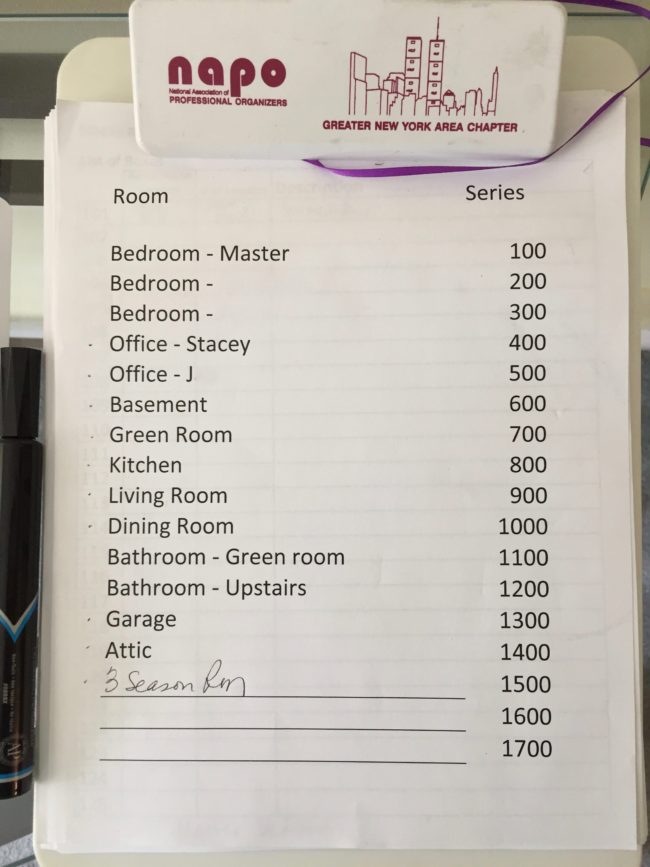
My ‘vintage’ NAPO-NY clipboard and trusty black marker.
Each room in our home received a number series. As we packed items from each room, we wrote down the contents of the box on the line next to the box number. We also jotted down where the contents/box would be in our rental and where it would go once it came back to our renovated home. An example is below:
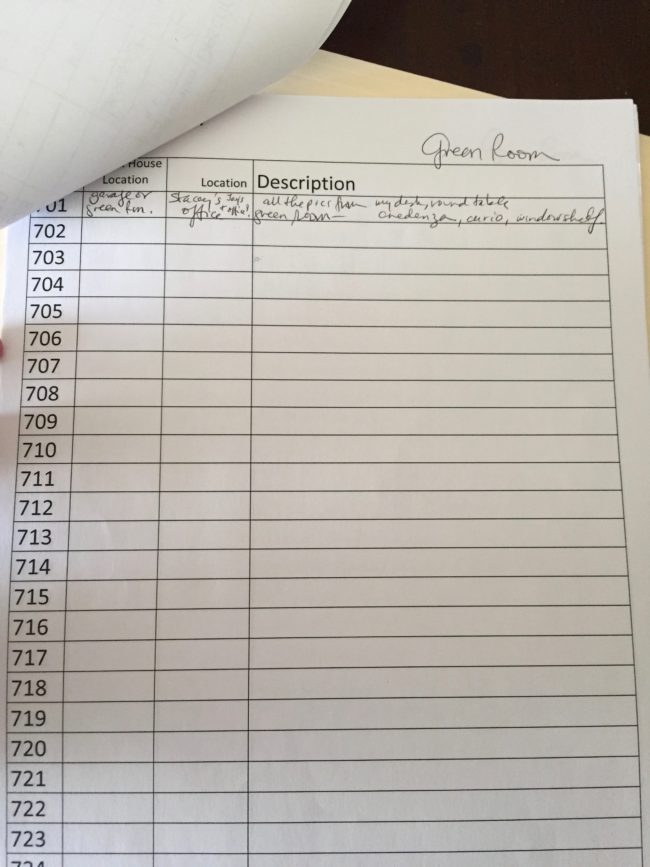
A sample page from our packing list.
Here’s the breakdown of the columns on the page:
• Top of the page: Room Name (also written at the bottom of page–not shown in photo)
• Column 1: Box number
• Column 2: Where box is going in rental home (a room vs. the garage for storage)
• Column 3: What room the box will go to when it comes back to our renovated home (our address was originally next to the word ‘Location’)
• Column 4: Contents of the box
In the above photo, the ‘Green Room’ (the walls had been green for many years) at this point only had one box. This was because my home office was relocated there after our second child was born and the contents of the room would eventually be spread to three different spaces after we moved back in. Lucky for us, our rental space was a split level very similar to ours so you see in column 2 that we figured the box would either live in the garage or be unpacked into the rental home’s equivalent of our ‘Green Room.’ In box 701 (column 1), was framed family pictures (column 4) (they ended up in the garage) that eventually would live in my home office and my husband’s home office (column 3).
Depending upon the room and it’s contents, some of the pages looked fairly empty. Then there are rooms such as the kitchen that practically filled two pages! (Yes–we did purge before packing.) Notice–the top part of the page dealt with the move to the rental property while the bottom part (and the next page, too) dealt with the move back to our home. We unpacked much of our kitchen stuff and then had to repack it for the move home. Example:
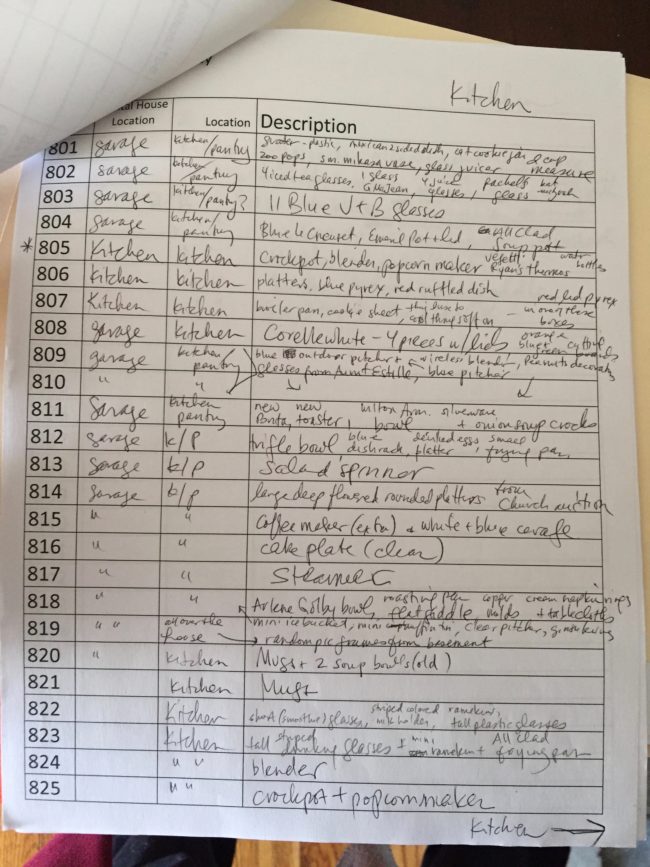
Lots more to pack in the kitchen!
You might be thinking, “This sounds like A LOT of work!’ Yes, it was a lot of work! But, when it comes to time management, I advise my clients that spending more time at the beginning of a project will save you time at the end of it. Take the time to write the contents of each box on your list. You’ll be happy you did when you’re looking for an item you need!
This system isn’t just for double moves. You can delete a column or add an extra one for your unique moving situation. My husband and I found this system to be incredibly helpful in keeping us organized and knowing where to find all that we owned.
A few tips for using this packing system:
• If you are keeping some numbered boxes in storage for a while, group the boxes by ‘like’ numbers (all 200’s together, all 500’s together, etc). It will make finding the box you need much less time consuming!
• Write the box numbers on the top and at least two sides of the box–the more sides the better–a good task for kids old enough to write!
• Use a thick dark colored marker for writing the numbers on the boxes. Buy a box of them–they will run out of ink quickly from numbering all of those sides!
• When you are finished packing, back it up! Make a photocopy of the Master List and put it somewhere safe and take pictures of each page with your phone.
• Designate one spot to keep your Master List in so you’ll always know where to return it to and where to find it the next time you want to pack/unpack more boxes.
We’ve been living in our renovated home almost six months and some of our boxes are not yet unpacked. I still refer to the Master List when I’m looking for something and it sits in the same spot I designated for it the day we moved back in. As helpful as this system was, my husband and I agree–we’re not moving again for a LONG time!
Could this system be helpful to you in a move? Let me know in the comments below.
SaveSave
SaveSave
I haven’t moved much in my lifetime. I went away to college and moved some of my stuff with me. As a single gal, I moved in and out of a one bedroom apartment, then moved those belongings to a house when I got married. After that, no moving for fourteen years.
So, when my husband and I decided to renovate and add on to our home, we chose to move our family and 98% of what we owned to a rental across town for the duration of the project. Once our house was finished we would pack up again and move back in. Two moves in one year. Gulp. I was a little out of practice. But, I knew that if we were organized, we’d get the job done with barely a few mishaps.
Here are some tips that helped us have an organized move (twice!):
Start purging early
If you have been in one place for a while, you have probably accumulated some ‘stuff.’ For some of you, you might have A LOT of ‘stuff.’ Advice that I learned early on and continue to pass on to my clients is, “Don’t pay to move anything you don’t want moved in the first place.” With that quote in mind, I created the ‘two-can’ rule. Every weekend, we purged an area of our home and made sure to fill our two garbage cans before trash collection day. Making decisions can take a while–my recommendation is to start purging as soon as you know you’ll be moving.
Delegate
It takes a village to pack up a home and move so line up your villagers and let them know how they can help! Some examples of how they can help you are:
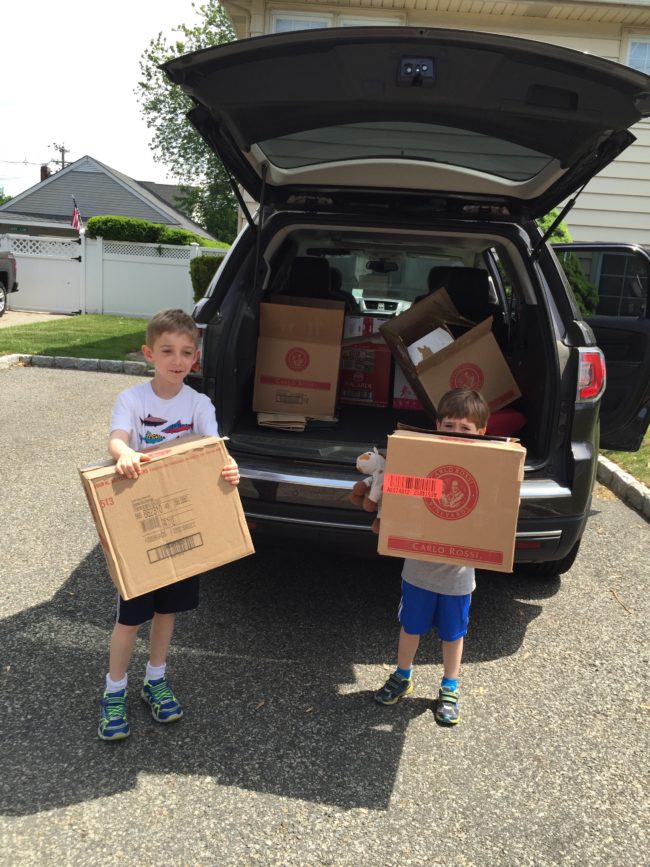
-Get your kids involved. Have them crumple up newspaper. Have them bring empty boxes to different rooms. Ask them to purge and pack their own belongings. It is a good exercise in decision-making and takes some tasks off your already-full plate.
-Ask friends and relatives to bring you their old newspapers, help you pack boxes, hold onto valuables, babysit your kids–whatever you need to ensure a smooth packing and moving experience.
-Get it delivered. The internet can be part of your village, too. Run out of packing tape? Order it. Need more boxes quick? Look on Craigslist or Facebook to see if any of your neighbors are getting rid of boxes and stuffing. Need to research moving companies? Google! And have dinner delivered, too…
–NAPO. Yes–there are Professional Organizers who specialize in packing and moving people. Head to the NAPO website to find someone in your area and let a professional be part of your village.
Organize your packing supplies
If you can, start the packing process as far in advance as you can. You’d be surprised how long it takes to pack an entire home! While you’re purging, this would be a great time to start collecting packing supplies such as:
-boxes from the liquor store or from a boxed product other than food
-a minimum of one tape gun per person doing the packing
-packing tape
-newspaper and store circulars
-thick black markers/Sharpies
-bubble wrap/packaging from packages you’ve received
-scissors/box cutter
-plastic wrap/plastic baggies of varying sizes
-paper/pen/labels
Keep all of your packing supplies in one spot. Use a bucket/caddy large enough to hold your tape gun, scissors, 2-3 black markers, labels, etc. A bucket/caddy is easy to transport from room to room and easy to spot amidst a room full of boxes. Place supplies back in the bucket when you’ve finished a box-packing session so you’ll know where they are the next time you want to fill a box.
Create an organized packing system
We had to keep track of over 100 boxes. Some of those boxes we unpacked in our rental home and some stayed packed for nine months in our garage. In order to find what we needed during those nine months, I had to create a packing system that would allow us to easily locate clothes and other belongings for Summer, Fall and Winter. Keep an eye out for my next post–you’ll see the Master Packing List my husband and I created to keep us organized through two moves.
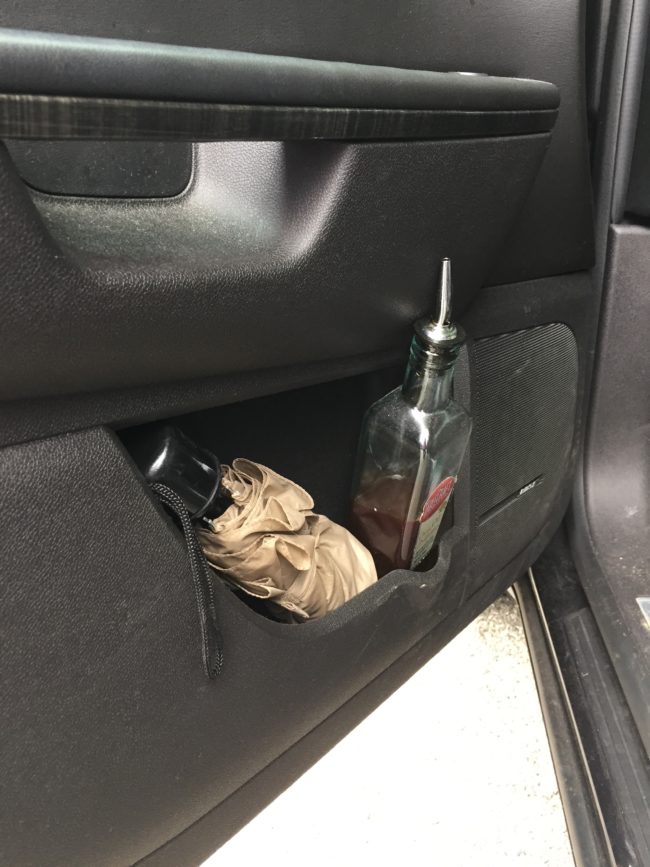
By the way, some things just don’t fit easily in a box. Here’s how I moved our close-to-full olive oil dispenser–who knew my driver’s side cup holder could be the perfect spot to nestle it for the short ride across town?
Thanks to some organization, our amazing ‘villagers,’ and a highly competent moving company, we survived our two moves!
Montvale Movers moved us twice!
Next post: The packing system that got me through two moves in a year…
SaveSave
SaveSave