Pinterest LinkedIn Facebook Instagram YouTube

Archive for the ‘ What’s In My Work Bag? ’ Category


3 Label Maker Hacks to Save You Time, Money, and Stress

15 Comments

3 Label Maker Hacks to Save You Time Money & Stress | organizedartistry.com #labelmaker #labelmakerhacks #getorganized

Good morning, class! Welcome to Label Maker Hacks 101. I’m Professor Murray and in today’s lesson we’re going to be discovering 3 label maker hacks to save you time, money, and stress.

Please take out your label maker, place it on the desk in front of you, and make sure the batteries are working. We’ll start off with some fingertip exercises, a quick review of the QWERTY keyboard, and then move on to today’s lesson.

If you have walked into my lecture hall by mistake but wish to stay and learn, please refer to my blog post: 5 Reasons Why You Should Own a Label Maker. It is required reading for the Label Maker Hacks 101 course…

No need to take any notes–I have all the label maker hack details outlined for you below. Let the learning begin!

Todays Lesson: 3 Label Maker Hacks to Save You Time, Money, and Stress

Hack #1: How to Save Tape

If you do not own a label maker you may not be aware of the fact that although a new label maker often comes with one ‘starter’ tape cartridge, in order to print more labels, you must purchase more tape cartridges. They can be purchased individually, in 4-packs, and in bulk.

When printing a label, the label maker leaves the first approximately half to three-quarters of an inch of tape blank and then starts printing the word(s) or phrase. After it has been printed, the label maker leaves another half to three-quarters of an inch blank on the right side of the word/phrase.

That’s A LOT of WASTED label tape. Wasted label tape = wasted money

For those who own label makers, you know how quickly a tape cartridge can run out of tape–usually in the middle of typing a long phrase or when you need to it to print out quickly (not that I have any experience with either of those…ahem…).

I’ve been using my label maker on the job and in my home for close to twenty years and in that time, I’ve discovered a way to save label maker tape. This works especially well when needing to print many related labels such as for folders in a file cabinet or for kid’s school supplies.

Here’s how you do it:
1-Think about your needs. What are you labeling? Spice jars? File folders? Pantry shelves?
2-On paper or on your phone, write the words or phrases you wish to create labels for.
3-Type those words/phrases into your label maker. As you type, press the space bar 5-6 times between each word/phrase. This will create a small blank space between each word/phrase.
4-Press the ‘Print’ button and watch your label maker miraculously give birth to one long label with all of your words/phrases on it.
5-Use the built-in cutting tool to separate the label from the label maker.
6-Use a scissor to cut in between each word/phrase.

Look how much label maker tape you’ve saved!

This label maker hack will eliminate a bulk of the wasted tape on both ends, saving you inches of tape and piles of money.

Hack #2: Keep Your Font Sizes and Styles on Display

Every label maker is different but most offer the user multiple font styles and font sizes to choose from.

Depending upon how old or new your label maker is determines how many font styles and font size options it has. I own a nineteen year old label maker so I only have 5 font sizes and 9 styles. Newer models have upwards of 14 fonts and 10 font styles.

When creating labels for a project, I like to be able to offer my clients some size and style options. Sometimes the nature of the project dictates what size and style font to use. Attic bins need the largest font while small objects require the use of the smallest font. But, sometimes we’re able to use any size and style–that’s when I ask my client to consider their choices.

In order to show my clients their style and size choices without printing all of them out on the spot (and repeatedly using an excessive amount of label tape), I devised a system that would save me precious time and precious label maker tape.

Here’s what I did–I advise you to do the same:
1-Select a short word (I chose cat because it’s short and hey, I like cats…)
2-Print out one label of that word for each size and style your label maker can create.
3-Stick the labels to the back of your label maker or on a large index card for easy reference. Keep the index card in the same place where you store your label maker.

3 Label Maker Hacks to Save You Time, Money & Stress | organizedartistry.com #labelmaker #labelmakerhacks #getorganized

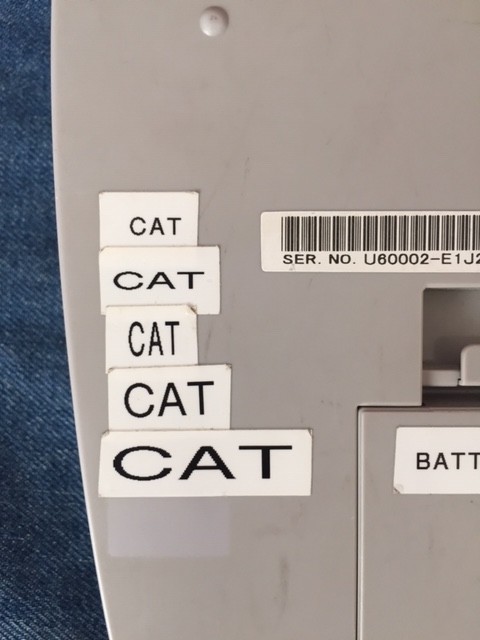
Taking time to set this up takes the work of remembering all the font styles and sizes out of your brain and onto the back of your label maker or on an index card.

After creating the font display almost two decades ago, I now just turn my label maker over, show my client the selection and say, “Pick the font you want!” Happy clients!

Hack #3: Split it Down the Middle

Label maker tape has two parts to it–the label itself and the backing that covers the stickiness.

If you’ve had a label maker for as long as I have, you may remember that label tape was not that easy to work with. When I started using a label maker almost twenty years ago, it was very challenging to get the backing off the label. And frustrating. The backing was about a hairline larger than the actual label. With a keen eye, a few long fingernails, and a lot of practice I was able to remove the backing fairly easily and look like a label maker rock star to my clients.

People must have filed complaints because Brother (the label maker company) eventually changed the backing of the label tape. Hallelujah! Now, the backing of the label splits in two horizontally allowing for MUCH EASIER removal. On the Brother website, it’s called ‘easy-to-use and easy-to-peel-off split-back’ tape.
Less stressed customers = happier customers!

No more struggling to remove the backing of the label. Here’s what to do:
1-Take the label with the words facing away from you and gently bend it in half away from you on the horizontal. You’ll notice a line that will divide the backing in two.
2-Remove both backing strips and apply the label to your surface.

Now you know how to take the backing off the label–what a time (and fingernail) saver!

I hope you enjoyed today’s class. There will be no final exam on the material. Your homework is to practice what you’ve learned and share these hacks with other label maker owners.

Now, go forth and share your new-found knowledge. Class dismissed!


Subscribe to the Organized Artistry Newsletter! | organizedartistry.com

5 Reasons Why You Should Own a Label Maker

14 Comments

5 reasons Why You Should Own a Label Maker | organizedartistry.com

You’ve seen them in the store. All those little buttons. The tape cassettes. The promise of perfectly lined up words and phrases, phrases you will stick on files and bins that will keep you organized for eternity…

You’ve may be hemming and hawing and asking yourself–do I really need one?

Should you buy a label maker?

You don’t need to be a Professional Organizer to own one. I’m here to tell you…

YES! BUY A LABEL MAKER!

I’ve had my Brother P-Touch for over fifteen years. Like a Timex watch, ‘It takes a licking and keeps on ticking…’ I think I’ve changed the batteries less than five times since I’ve owned it. A doctor uses a stethoscope. A tailor uses a sewing machine. A professional organizer goes nowhere without a label maker.

There are a few different brands of label makers, but I prefer the products made by Brother.

It has been an indispensable tool in my organizer’s work bag. Clients love when I take it out of my bag and place it on their table. I’ve seen small children and animals mystified by the tape that comes out of the side of the machine.

Have I convinced you yet of their wonderfulness and that you need to own one? If you’re still reading this post then I guess you haven’t darted off to the store. OK, here are…

Five Reasons Why You Should Own a Label Maker

1. Label makers make our lives easier . They’re light, portable and those labels help us identify items quickly–saving us time and energy. Label makers are especially helpful to those who have illegible handwriting, too.

2. Label makers make getting organized enjoyable. Label Makers make people happy. Thus, people are happy when they are getting organized, making the process more enjoyable.

3. You can express yourself with label maker tape. Do you know the phrase, “It’s not all black and white?’ Well, neither are the label maker tape cassettes. Most often, I use black text on white tape but there are other options such as black text on clear tape, black text on yellow or black text on red tape.

4. Printed labels make you feel organized. Printed labels are easily identifiable and readable–close-up and from far away. They create order where they may be chaos.

5. You’ll be the envy of all your friends! They’re going to wish their files and bins could look as great and be as organized as yours with that labelmaker in your hand!

Did you make your decision–to buy or not to buy? If you said, ‘BUY!’ you won’t regret this purchase. Check online and in local stores for different models/features and the best price. I bought my label maker in Costco back in 2001–don’t forget to check in those type of stores, too. Buy the tapes in bulk from an office supply store or use a coupon to bring down the price.

Happy Labeling!


Subscribe to the Organized Artistry Newsletter! | organizedartistry.com

SaveSave

SaveSave

What’s in My Work Bag? The Tape Measure

2 Comments

Do you remember Felix the Cat? If not, here’s a little background: Felix the Cat was a cartoon character. Felix had a ‘bag of tricks’ also known as the ‘magic bag.’ He always had what he needed when he needed it–and it was all in that bag.

When I go to a client’s home, I bring a tote bag of basic organizing supplies. Some of my clients have called it my ‘magic bag of tricks’ because the contents of that bag seem to ‘magically’ help them get organized.

What’s in my ‘magic bag of tricks?’ I’ll be sharing the contents with you in blog posts called ‘What’s in My Work Bag?’ Today’s first nosedive into my workbag brings up…

The Tape Measure

If tape measures were not such an important tool, there would be no such thing as the saying, ” Cut once, but measure twice.”

Using a tape measure is critical to organizing any space in your home–especially when incorporating organizing products into that space. ‘Measure twice and buy organizing products once’ is my motto!

I don’t just carry one tape measure. I carry TWO. One is 15 feet long and the other is 5 feet long and attaches to a clip in my bag. Why two? Each organizing job is different. I could be organizing a large house one day and a studio apartment the next. I could be measuring a double closet in the morning and measuring kitchen drawers in the afternoon. No need to use the 15 footer if I’m checking out the size of a medicine cabinet. On the flip side, it would be tedious to attempt to measure and organize a garage with a five foot long tape measure.

Tape measures are equally as important to me at work and at home–I keep one in the kitchen. I even carry a teeny tiny 3 foot measuring tape in my purse! This comes in handy when I’m in a store and I need to measure an item for my home or believe it or not, the waistband of pants for my 5 year old who is super-skinny.

Tape measures aren’t just for Professional Organizers. Everyone should own at least one for their home.You never know when you’ll need to measure the size of your room, the length of your curtains, or a space that needs an organizing product. For a great selection try your local hardware store or big box store such as Home Depot or Lowe’s.

And always remember, ‘Measure twice and buy organizing products once!’


Want to stay current and connected to Organized Artistry? Follow us on Facebook, Pinterest, YouTube, LinkedIn, and Goodreads!

Click here to sign up for Organized Artistry’s motivating monthly newsletter.

Got Post Its?

Share your comments...

I don’t know anyone who doesn’t love Post-Its. Those somewhat sticky pieces of colored paper have become an everyday part of our lives. I have two or three packages of them on my desk and a ziploc baggie full of different sizes and colors in my work bag. I love Post Its so much, I even use the Classic Stickies program on my Mac–I’d be lost with out it.

We use them for reminders, to dos, shopping lists and a myriad of other uses. But I thought I’d share some great tips in the following article:

Creative Uses for 3M Post It Notes

I already use a few of the ideas offered by the experts but I plan on utilizing #18 next time my five year old is bored…

Get creative and have fun with your Post Its!

What area of YOUR life needs organizing?

Contact Stacey to Get Started!
NAPO Member NAPO Golden Circle NAPO Specialist Residential Organizing NAPO Household Management NAPO Life Transitions Bergen Health and Life 2015 Virtual Organizing Services
Top